하나. get_method
2. 우체국_방법
삼. 받다_우체국_방법 1
4. 받다_우체국_방법-2
5. 받다_우체국_방법-3
6. 받다_우체국_방법-4
7. 포함)중요)
8일. 포함 HTML에서 JSP로
================================================== ===============
다음 월요일
https://mdh2057.71
2023년 3월 27일(월)
1. Pagination 2. Tooltip 3. Popover 4. Toasts 5. Float 6. Margin 7. Width, Height 8. Responsive Embeds 9. 연습 1) bootstrap home page tep -1 , 1) bootstrap home page tt -2 10 .JSP 시작 1) Java에서 1에서 10까지의 합계
mdh2057.tistory.com
알아 가다: 서블릿(서블릿)는 웹 서비스 기능을 제공하는 Java 클래스를 나타냅니다.
하나. get_method
form 태그로 제출할 때
http://localhost:9090/JSPServletBegin/01_getMethod.do로 데이터 보내기
mmethod를 생략하면 method=”get”이 됩니다.
GET 방식은 웹 브라우저의 주소 표시줄에 전송할 http://URL 주소? (?가 나타나면 GET 방식임을 기억하세요)
? 을 중심으로 왼쪽은 사이트 URL 주소이고 오른쪽은 전송할 데이터를 지정합니다.
예를 들어, 제출할 데이터는 이름 = 민콩 & 학교 = 대학원
&는 데이터 구분 기호 역할을 합니다.하다
GET 메서드는 웹 브라우저의 주소 표시줄에 데이터 값을 노출하므로 보안 수준이 떨어집니다.
반면에 POST 방식은 데이터 값을 웹 브라우저의 주소 표시줄이 아닌 본문으로 보내기 때문에 안전합니다.
하지만 속도면에서는 GET 방식이 POST 방식보다 조금 더 빠릅니다!!! (예시 김밥 => GET은 김밥 줌만, POST는 보안을 위해 김밥을 포장지에 싸서 주고, 김밥을 먹으려면 포장지를 의미해야 합니다.)
따라서 일반적으로 GET 방식은 보안과 관련되지 않은 데이터 조회(예: 제품 정보 조회)와 같은 선택된 절에서 주로 사용됩니다.
회원가입 또는 회원정보 변경 시 입력하는 정보는 개인정보이므로 보안이 철저해야 합니다.
즉, 삽입이나 업데이트와 같은 DML 작업에는 일반적으로 POST 방식이 사용된다.
전송이 진행 중일 때 켜집니다. <%= ctxPath %>처리를 요청하기 위해 /01_getMethod.do를 보냈습니다.
JSPServletBegin/01_getMethod.do를 다루는 사람은 배포 설명자인 web.sml에 설명되어야 합니다.
web.xml로 이동하면 /01_getMethod.do가 URL 패턴으로 사용됩니다.
그러면 chap02.GetMethod_01이 클래스 이름으로 사용됩니다.
Chap02.GetMethod_01, 클래스 이름
!!! web.xml 파일을 언제 읽을지는 매우 중요합니다. 만약에
WAS가 시작되면 web.xml 파일에 기술된 내용을 한 번만 읽어오며 WAS는 web.xml 파일에 기술된 내용대로 동작한다.
따라서 web.xml 파일에 컨텐츠를 추가하거나 삭제할 때 WAS의 전원을 껐다가 다시 켜야 변경된 컨텐츠로 동작합니다. !!!!
=== 서블릿이란 무엇입니까? 웹 서비스 기능을 제공하는 Java 클래스입니다. ===
*** 서블릿이 되려면 세 가지 규칙을 따라야 합니다. ***
1. 서블릿은 javax.servlet.http.HttpServlet 클래스를 상위 클래스로 상속해야 합니다.
2. 웹 클라이언트의 요청 방식이 GET인 경우 doGet() 방식으로 응답하기 위한 코딩이 필요합니다.
웹 클라이언트의 요청 메서드가 POST인 경우 doPost() 메서드가 응답하도록 코딩해야 합니다. 따라서 doGet() 및 doPost() 메서드를 재정의해야 합니다.
doGet() 및 doPost() 메소드의 첫 번째 매개변수는 HttpServletRequest 유형이고 두 번째 매개변수는 HttpServletResponse 유형입니다.
3. 서블릿에서 웹 브라우저에 결과를 표시하려면
doGet() 및 doPost() 메소드 모두 서블릿의 두 번째 매개변수인 HttpServletResponse 응답을 사용하여 출력합니다.
===== jsp 전체 코드 =====
<%@ page language="java" contentType="text/html; charset=UTF-8"
pageEncoding="UTF-8"%>
<%
// 암기 하기
// 컨텍스트 패스명(context path name)을 알아오고자 한다.
String ctxPath = request.getContextPath();
System.out.println("ctxPath => " + ctxPath);
// 결과 : ctxPath => /JSPServletBegin <== WAS (톰켓서버) Document Base Path 설정의 기본값임.
// 톰켓에서 바꾼후 /aaa 로 결과
// 결과 : ctxPath => /aaa <== WAS (톰켓서버) Document Base Path 설정을 /aaa으로 변경한 경우.
// 톰켓에서 바꾼후 아무글자없는것으로 바꾼 결과
// 결과 : ctxPath => <== WAS (톰켓서버) Document Base Path 설정을 아무것도 없는것 또는 / 으로 변경한 경우.
// 기본 주소: http://localhost:9090/JSPServletBegin/chap02/01_getMethod.jsp
// 바꾸는 방법 : https://mdh2057.71
%>
<!DOCTYPE html>
<html>
<head>
<meta charset="UTF-8">
<title>form 태그의 GET 방식으로 데이터 전송하기</title>
<style type="text/css">
ul {
list-style-type: none;
}
li {
line-height: 200%;
}
</style>
<script type="text/javascript" src="http://mdh2057.m/<%= ctxPath %>/js/jquery-3.6.4.min.js"></script>
<script type="text/javascript">
$(document).ready(function(){
$("form(name="registerFrm")").submit(function(){
if($("input#name").val().trim() == "" ) { // 이름이 공백이라면
alert("성명은 필수항목 이오니 성명을 입력하세요!!");
return false; // return false; 이 submit(전송)을 하지 말라는 뜻이다.
}
});
});
</script>
</head>
<body>
<form name="registerFrm" action="<%= ctxPath %>/01_getMethod.do" method="get"> <!-- method 에 get을 쓰면 전송되어질 값이 보이고 post 를 쓰면 전송되어질 값이 안보인다. (method 생략시 같다.) -->
<%-- !!! 중요 !!! (암기 부분)
확장자가 .jsp 또는 .html 인 파일에서 URL 경로를 나타낼 때 맨 앞에 / 가 오면
그 앞에는 자동적으로 http://ip주소:포트번호 가 붙게 된다.
현재 <%= ctxPath %> 이 /JSPServletBegin 이므로 <%= ctxPath %>/01_getMethod.do 의 뜻은
http://localhost:9090/JSPServletBegin/01_getMethod.do 이라는 말이다.
--%>
<%--
form 태그에서 submit(전송)을 하면
http://localhost:9090/JSPServletBegin/01_getMethod.do 으로 데이터를 전송시킨다
만약에 mmethod를 생략하면 method="get" 으로 되어진다.
GET 방식은 웹브라우저 주소창에 http://URL주소?전송되어질데이터 와 같이 나타내주는 것이며 (? 가 나올시 GET 방식임을 기억하자)
? 를 중심으로 왼쪽은 사이트 URL 주소이며, 오른쪽은 전송되어질 데이터를 나타낸다.
전송되어질 데이터는 예를 들어 name=민콩&school=초대졸 와 같이 나오는데
& 는 데이터구분자 역할을 해준다.
GET 방식은 웹브라우저 주소창에 데이터 값을 공개하므로 보안성이 떨어지지만
그에 비해 POST 방식은 웹브라우저 주소창에 데어터값을 담는 것이 아니라 본문(body)에 데이터 값을 담아서 보내므로 보안성이 좋다.
그런데 속도측면에서는 POST 방식 보다는 GET 방식이 좀 더 빠르다!!! (김밥 예시 => GET 은 그냥 김밥줌 , POST 보안을 위해 포장지에 김밥을 주고 김밥을 먹으려면 포장지를 뜻어야함 )
그래서 일반적으로 보안과 관계없는 데이터조회(예: 물품정보 조회) 와 같은 select 절에서는 GET 방식을 주로 사용한다.
회원가입시 또는 회원정보변경시 입력되어질 데이터는 개인 정보이므로 보안성이 있어야 한다.
즉, insert 또는 update 와 같이 DML 작업은 일반적으로 POST 방식이 주로 사용된다.
--%>
<%--
submit(전송) 을 하면 <%= ctxPath %>/01_getMethod.do 로 보내어서 처리를 요청한다.
/JSPServletBegin/01_getMethod.do 은 누가 처리를 해주는지 배치서술자인 web.sml 에 기술해주어야 한다.
web.xml 에 가보면 <servlet-mapping> 에 URL 패턴으로 /01_getMethod.do 가 기술되어 있고
이어서 실제로 처리해주는 <servlet-class> 에 클래스명으로 chap02.GetMethod_01 이 기술되어 있다.
바로 이렇게 기술되어진 <servlet-class> 클래스명인 chap02.GetMethod_01 가 action 퍼리를 해주게 된다.
!!! 아주 중요한 것은 web.xml 파일을 언제 읽어들이느냐 하면
WAS가 구동(start) 가 되어질 때 web.xml 파일에 기술된 내용을 딱 1번만 읽어들어서 web.xml 파일에 기술된 내용대로 WAS가 작동하도록 되어진다.
그러므로 web.xml 파일에 내용을 추가하거나 삭제하는 등 변경되어지면 변경된 내용대ㅐ로 작동하기 위해서는 WAS를 반드시 껏다가 다시 켜애만 변경되어진 내용대로 작동된다. !!!!
--%>
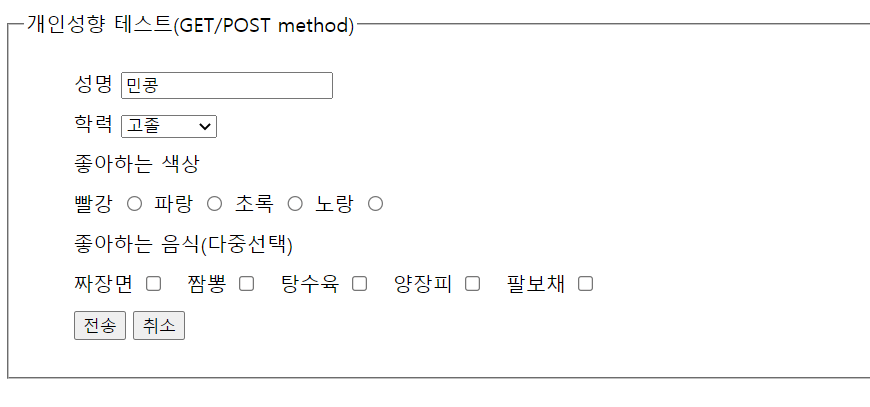
<fieldset>
<legend>개인성향 테스트(GET method)</legend>
<ul>
<li>
<label for="name">성명</label>
<input type="text" name="name" id="name" placeholder="성명입력"/>
</li>
<li>
<label for="school">학력</label>
<select name="school" id="school"> <!-- 관습상 id와 name 을 같게 한다. -->
<option >고졸</option> <!-- value 값이 주소로 넘어감 안쓰면 쓴 내용이 value 값으로 넘어감 지금은 고졸 아래줄은 초대줄 -->
<option >초대졸</option>
<option >대졸</option>
<option value="대학원졸">대학원졸</option>
</select>
</li>
<li>
<label for="">좋아하는 색상</label>
<div>
<label for="red">빨강</label>
<input type="radio" name="color" id="red" value="red" />
<label for="blue">파랑</label>
<input type="radio" name="color" id="blue" value="blue" />
<label for="green">초록</label>
<input type="radio" name="color" id="green" value="green" />
<label for="yellow">노랑</label>
<input type="radio" name="color" id="yellow" value="yellow" />
</div>
</li>
<li>
<label for="">좋아하는 음식(다중선택)</label>
<div>
<label for="food1">짜장면</label>
<input type="checkbox" name="food" id="food1" value="짜장면" />
<label for="food2">짬뽕</label>
<input type="checkbox" name="food" id="food2" value="짬뽕" />
<label for="food3">탕수육</label>
<input type="checkbox" name="food" id="food3" value="탕수육" />
<label for="food4">양장피</label>
<input type="checkbox" name="food" id="food4" value="양장피" />
<label for="food5">팔보채</label>
<input type="checkbox" name="food" id="food5" value="팔보채" />
</div>
</li>
<li>
<input type="submit" value="전송" />
<input type="reset" value="취소" />
</li>
</ul>
</fieldset>
</form>
</body>
</html>===== 전체 자바 코드 =====
package chap02;
import java.io.IOException;
import java.io.PrintWriter;
import javax.servlet.http.HttpServlet;
import javax.servlet.http.HttpServletRequest;
import javax.servlet.http.HttpServletResponse;
/*
=== Servlet 이란 ? 웹서비스 기능을 해주는 자바 클래스를 말한다. ===
*** Servlet 이 되기 위한 조건은 3가지 규칙을 따라야 한다. ***
1. 서블릿(Servlet)은 반드시
javax.servlet.http.HttpServlet 클래스를 부모 클래스로 상속을 받아와야 한다.
2. 웹클라이언트의 요청방식이 GET 방식으로 요청을 해오면
doGet() 메소드로 응답을 해주도록 코딩을 해야하고,
웹클라이언트의 요청방식이 POST 방식으로 요청을 해오면
doPost() 메소드로 응답을 해주도록 코딩을 해주어야만 한다.
그러므로 반드시 doGet() 메소드와 doPost() 메소드를
Overriding(재정의)를 해주어야만 한다.
doGet() 메소드와 doPost() 메소드의
첫번째 파라미터는 HttpServletRequest 타입이고,
두번째 파라미터는 HttpServletResponse 타입이다.
3. 만약에 서블릿(Servlet)에서 결과물을 웹브라우저상에 출력하고자 한다라면
doGet() 메소드와 doPost() 메소드 모두
서블릿(Servlet)의 두번째 파라미터인 HttpServletResponse response 를
사용하여 출력해준다.
*/
public class GetMethod_01 extends HttpServlet {
/**
*
*/
private static final long serialVersionUID = 1L;
@Override
protected void doGet(HttpServletRequest request, HttpServletResponse response) throws IOException{
System.out.println("~~~~ 확인용 : doGet 메소드가 호출됨 ~~~~~");
// 첫번째 파라미터인 HttpServletRequest request 가 폼태그에서 전송되어져온 데이터를 처리해주는 용도로 쓰인다.
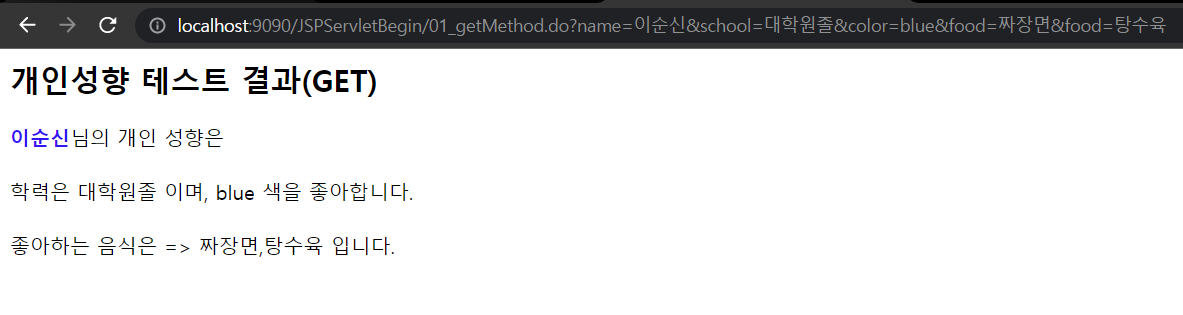
String name = request.getParameter("name"); // !!!!!!!!! 암기하기 !!!!!!!!! 전 페이지에서 써준 이름의 값이 나온다
String school = request.getParameter("school"); // school 에 담겨진 값을 얻어온다.
String color = request.getParameter("color"); // color 에 담겨진 값을 얻어온다.
String() arr_food = request.getParameterValues("food"); // 복수개 선택하는것을 배열로서 받아오는 것이다.
//*** 콘솔에 출력하기 시작 *** //
System.out.println("name => "+name);
System.out.println("school => "+school);
if(color == null) {
color = "없음";
}
System.out.println("color => " +color);
if(arr_food != null) {
for(int i=0; i<arr_food.length; i++) {
System.out.println("arr_food ("+i+") => " + arr_food(i));
}// end of for--------------
String likeFoodes = String.join(",", arr_food);
System.out.println("좋아하는 음식은 =>"+ likeFoodes);
}
else {
System.out.println("좋아하는 음식이 없습니다");
}
//*** 콘솔에 출력하기 끝 *** //
// **** 웹 브라우저에 출력하기 시작 **** //
//HttpServletResponse response 객체는 전송되어져온 데이터를 조작해서 결과물을 나타내고자 할 때 쓰인다.
response.setContentType("text/html; charset=UTF-8");
PrintWriter out = response.getWriter();
// out 은 웹브라우저에 기술하는 대상제라고 생각하자
out.println("<html>");
out.println("<head><title>개인성향 테스트 결과 화면</title></head>");
out.println("<body>");
out.println("<h2>개인성향 테스트 결과(GET)</h2>");
out.printf("<span style="color: blue; font-weight: bold;">%s</span>님의 개인 성향은<br><br>", name);
if(!"없음".equals(color)) {
out.printf("학력은 %s 이며, %s 색을 좋아합니다.<br><br>", school, color);
}
else {
out.printf("학력은 %s 이며, 좋아하는 색이 없습니다.<br><br>", school);
}
/*
%d ==> decimal 정수
%f ==> float 실수
%s ==> String 문자열
*/
String foodes = "";
if(arr_food != null) {
foodes = String.join(",",arr_food) + " 입니다.";
}
else {
foodes = "없습니다.";
}
out.println("좋아하는 음식은 => " + foodes);
out.println("</body>");
out.println("</html>");
// **** 웹 브라우저에 출력하기 끝 **** //
}
@Override
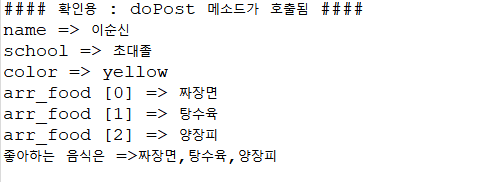
protected void doPost(HttpServletRequest request, HttpServletResponse response) throws IOException{
System.out.println("#### 확인용 : doPost 메소드가 호출됨 ####");
}
}===== web.xml 전체 코드 =====
<?xml version="1.0" encoding="UTF-8"?>
<web-app xmlns:xsi="http://www.w3.org/2001/XMLSchema-instance" xmlns="http://xmlns.jcp.org/xml/ns/javaee" xsi:schemaLocation="http://xmlns.jcp.org/xml/ns/javaee http://xmlns.jcp.org/xml/ns/javaee/web-app_4_0.xsd" id="WebApp_ID" version="4.0">
  <display-name>JSPServletBegin</display-name>
  <welcome-file-list>
    <welcome-file>index.html</welcome-file>
    <welcome-file>index.jsp</welcome-file>
    <welcome-file>index.htm</welcome-file>
    <welcome-file>default.html</welcome-file>
    <welcome-file>default.jsp</welcome-file>
    <welcome-file>default.htm</welcome-file>
  </welcome-file-list>

  <servlet>
  	<servlet-name>01_GetMethod</servlet-name>
  	<servlet-class>chap02.GetMethod_01</servlet-class>   <!-- 요 클래스가 응답을 해준다. -->
  </servlet>

  <servlet-mapping>
  	<servlet-name>01_GetMethod</servlet-name>
  	<url-pattern>/01_getMethod.do</url-pattern>

  </servlet-mapping>
  <!--  === 중요 === (암기 부분)

		확장자가 .xml 또는 .java 인 파일에서 URL 경로를 나타낼 때 맨 앞에 / 가 오면
		그 앞에는 자동적으로 http://ip주소:포트번호/컨텍스트패스명 이 붙게 된다.

		현재 /JSPServletBegin/01_getMethod.do 이므로
		http://localhost:9090/JSPServletBegin/01_getMethod.do 이 된다.
  -->


   <servlet>
  	<servlet-name>02_postMethod</servlet-name>
  	<servlet-class>chap02.PostMethod_02</servlet-class>   <!-- 요 클래스가 응답을 해준다. -->
  </servlet>

  <servlet-mapping>
  	<servlet-name>02_postMethod</servlet-name>
  	<url-pattern>/02_postMethod.do</url-pattern>

  </servlet-mapping>


</web-app>
===== 결과 =====

2. 우체국_방법
GET 방법과 달리 POST 방법은 주소 표시줄에서 수행한 작업을 숨길 수 있습니다.
포스트 방식으로 전송되는 데이터 중 영문이 깨지지 않고,
한글로 글자의 모양이 깨집니다.
그래서 포스트 방식으로 전송된 한글 데이터가 손상되지 않도록 하려면,
아래와 같이 request.setCharacterEncoding(“UTF-8”); 해야 할 것
request.getParameter(“변수 이름”); 즉, 먼저 수행해야 합니다.
xml 파일은 변경 없이 사용됩니다.
===== jsp 전체 코드 =====
<%@ page language="java" contentType="text/html; charset=UTF-8"
pageEncoding="UTF-8"%>
<%
// 암기 하기
// 컨텍스트 패스명(context path name)을 알아오고자 한다.
String ctxPath = request.getContextPath();
System.out.println("ctxPath => " + ctxPath);
// 결과 : ctxPath => /JSPServletBegin <== WAS (톰켓서버) Document Base Path 설정의 기본값임.
// 톰켓에서 바꾼후 /aaa 로 결과
// 결과 : ctxPath => /aaa <== WAS (톰켓서버) Document Base Path 설정을 /aaa으로 변경한 경우.
// 톰켓에서 바꾼후 아무글자없는것으로 바꾼 결과
// 결과 : ctxPath => <== WAS (톰켓서버) Document Base Path 설정을 아무것도 없는것 또는 / 으로 변경한 경우.
// 기본 주소: http://localhost:9090/JSPServletBegin/chap02/01_getMethod.jsp
// 바꾸는 방법 : https://mdh2057.71
%>
<!DOCTYPE html>
<html>
<head>
<meta charset="UTF-8">
<title>form 태그의 Post 방식으로 데이터 전송하기</title>
<style type="text/css">
ul {
list-style-type: none;
}
li {
line-height: 200%;
}
</style>
<script type="text/javascript" src="http://mdh2057.m/<%= ctxPath %>/js/jquery-3.6.4.min.js"></script>
<script type="text/javascript">
$(document).ready(function(){
$("form(name="registerFrm")").submit(function(){
if($("input#name").val().trim() == "" ) { // 이름이 공백이라면
alert("성명은 필수항목 이오니 성명을 입력하세요!!");
return false; // return false; 이 submit(전송)을 하지 말라는 뜻이다.
}
});
});
</script>
</head>
<body>
<form name="registerFrm" action="<%= ctxPath %>/02_postMethod.do" method="Post"> <!-- method 에 get을 쓰면 전송되어질 값이 보이고 post 를 쓰면 전송되어질 값이 안보인다. (method 생략시 같다.) -->
<%-- !!! 중요 !!! (암기 부분)
확장자가 .jsp 또는 .html 인 파일에서 URL 경로를 나타낼 때 맨 앞에 / 가 오면
그 앞에는 자동적으로 http://ip주소:포트번호 가 붙게 된다.
현재 <%= ctxPath %> 이 /JSPServletBegin 이므로 <%= ctxPath %>/01_getMethod.do 의 뜻은
http://localhost:9090/JSPServletBegin/01_getMethod.do 이라는 말이다.
--%>
<%--
form 태그에서 submit(전송)을 하면
http://localhost:9090/JSPServletBegin/01_getMethod.do 으로 데이터를 전송시킨다
만약에 mmethod를 생략하면 method="get" 으로 되어진다.
GET 방식은 웹브라우저 주소창에 http://URL주소?전송되어질데이터 와 같이 나타내주는 것이며 (? 가 나올시 GET 방식임을 기억하자)
? 를 중심으로 왼쪽은 사이트 URL 주소이며, 오른쪽은 전송되어질 데이터를 나타낸다.
전송되어질 데이터는 예를 들어 name=민콩&school=초대졸 와 같이 나오는데
& 는 데이터구분자 역할을 해준다.
GET 방식은 웹브라우저 주소창에 데이터 값을 공개하므로 보안성이 떨어지지만
그에 비해 POST 방식은 웹브라우저 주소창에 데어터값을 담는 것이 아니라 본문(body)에 데이터 값을 담아서 보내므로 보안성이 좋다.
그런데 속도측면에서는 POST 방식 보다는 GET 방식이 좀 더 빠르다!!! (김밥 예시 => GET 은 그냥 김밥줌 , POST 보안을 위해 포장지에 김밥을 주고 김밥을 먹으려면 포장지를 뜻어야함 )
그래서 일반적으로 보안과 관계없는 데이터조회(예: 물품정보 조회) 와 같은 select 절에서는 GET 방식을 주로 사용한다.
회원가입시 또는 회원정보변경시 입력되어질 데이터는 개인 정보이므로 보안성이 있어야 한다.
즉, insert 또는 update 와 같이 DML 작업은 일반적으로 POST 방식이 주로 사용된다.
--%>
<%--
submit(전송) 을 하면 <%= ctxPath %>/01_getMethod.do 로 보내어서 처리를 요청한다.
/JSPServletBegin/01_getMethod.do 은 누가 처리를 해주는지 배치서술자인 web.sml 에 기술해주어야 한다.
web.xml 에 가보면 <servlet-mapping> 에 URL 패턴으로 /01_getMethod.do 가 기술되어 있고
이어서 실제로 처리해주는 <servlet-class> 에 클래스명으로 chap02.GetMethod_01 이 기술되어 있다.
바로 이렇게 기술되어진 <servlet-class> 클래스명인 chap02.GetMethod_01 가 action 퍼리를 해주게 된다.
!!! 아주 중요한 것은 web.xml 파일을 언제 읽어들이느냐 하면
WAS가 구동(start) 가 되어질 때 web.xml 파일에 기술된 내용을 딱 1번만 읽어들어서 web.xml 파일에 기술된 내용대로 WAS가 작동하도록 되어진다.
그러므로 web.xml 파일에 내용을 추가하거나 삭제하는 등 변경되어지면 변경된 내용대ㅐ로 작동하기 위해서는 WAS를 반드시 껏다가 다시 켜애만 변경되어진 내용대로 작동된다. !!!!
--%>
<fieldset>
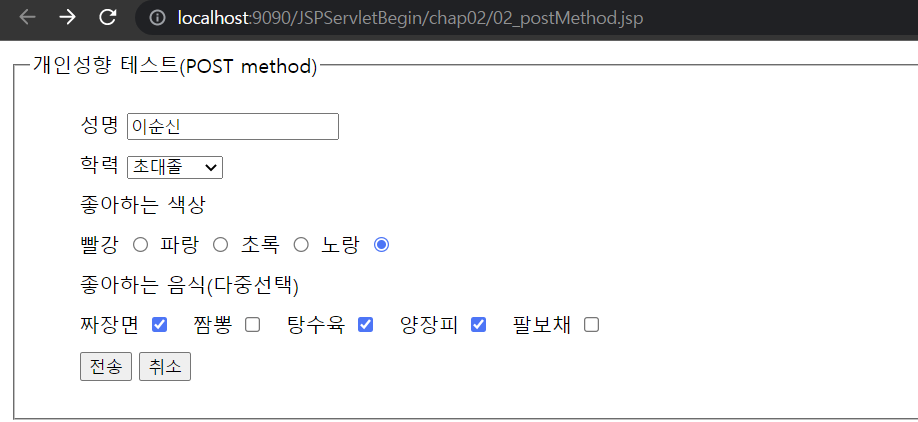
<legend>개인성향 테스트(POST method)</legend>
<ul>
<li>
<label for="name">성명</label>
<input type="text" name="name" id="name" placeholder="성명입력"/>
</li>
<li>
<label for="school">학력</label>
<select name="school" id="school"> <!-- 관습상 id와 name 을 같게 한다. -->
<option >고졸</option> <!-- value 값이 주소로 넘어감 안쓰면 쓴 내용이 value 값으로 넘어감 지금은 고졸 아래줄은 초대줄 -->
<option >초대졸</option>
<option >대졸</option>
<option value="대학원졸">대학원졸</option>
</select>
</li>
<li>
<label for="">좋아하는 색상</label>
<div>
<label for="red">빨강</label>
<input type="radio" name="color" id="red" value="red" />
<label for="blue">파랑</label>
<input type="radio" name="color" id="blue" value="blue" />
<label for="green">초록</label>
<input type="radio" name="color" id="green" value="green" />
<label for="yellow">노랑</label>
<input type="radio" name="color" id="yellow" value="yellow" />
</div>
</li>
<li>
<label for="">좋아하는 음식(다중선택)</label>
<div>
<label for="food1">짜장면</label>
<input type="checkbox" name="food" id="food1" value="짜장면" />
<label for="food2">짬뽕</label>
<input type="checkbox" name="food" id="food2" value="짬뽕" />
<label for="food3">탕수육</label>
<input type="checkbox" name="food" id="food3" value="탕수육" />
<label for="food4">양장피</label>
<input type="checkbox" name="food" id="food4" value="양장피" />
<label for="food5">팔보채</label>
<input type="checkbox" name="food" id="food5" value="팔보채" />
</div>
</li>
<li>
<input type="submit" value="전송" />
<input type="reset" value="취소" />
</li>
</ul>
</fieldset>
</form>
</body>
</html>===== 전체 자바 코드 =====
package chap02;
import java.io.IOException;
import java.io.PrintWriter;
import javax.servlet.http.HttpServlet;
import javax.servlet.http.HttpServletRequest;
import javax.servlet.http.HttpServletResponse;
public class PostMethod_02 extends HttpServlet{
/**
*
*/
private static final long serialVersionUID = 1L;
@Override
protected void doGet(HttpServletRequest request, HttpServletResponse response) throws IOException{
System.out.println("~~~~ 확인용 : doGet 메소드가 호출됨 ~~~~~");
}
@Override
protected void doPost(HttpServletRequest request, HttpServletResponse response) throws IOException{
System.out.println("#### 확인용 : doPost 메소드가 호출됨 ####");
/*
post 방식으로 넘어온 데이터중 영어는 글자가 안깨지지만,
한글은 글자모양이 깨져나온다.
그래서 post 방식에서 넘어온 한글 데이터가 글자가 안깨지게 하려면
아래처럼 request.setCharacterEncoding("UTF-8"); 을 해야 한다.
주의할 것은 request.getParameter("변수명"); 보다 먼저 기술을 해주어야 한다는 것이다.
*/
request.setCharacterEncoding("UTF-8"); // 한글이 안깨지게 하기 위해
// 첫번째 파라미터인 HttpServletRequest request 가 폼태그에서 전송되어져온 데이터를 처리해주는 용도로 쓰인다.
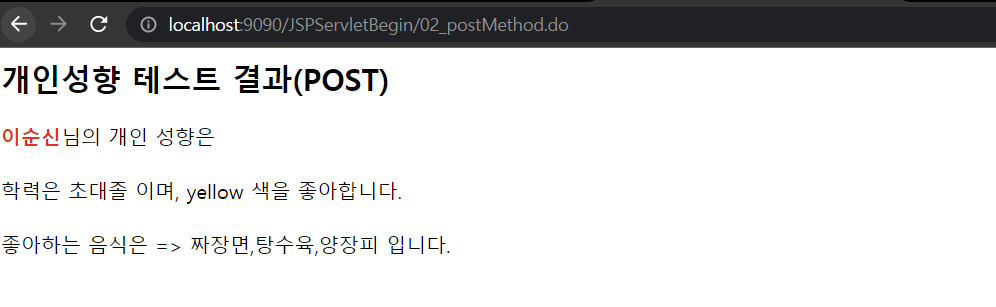
String name = request.getParameter("name"); // !!!!!!!!! 암기하기 !!!!!!!!! 전 페이지에서 써준 이름의 값이 나온다
String school = request.getParameter("school"); // school 에 담겨진 값을 얻어온다.
String color = request.getParameter("color"); // color 에 담겨진 값을 얻어온다.
String() arr_food = request.getParameterValues("food"); // 복수개 선택하는것을 배열로서 받아오는 것이다.
//*** 콘솔에 출력하기 시작 *** //
System.out.println("name => "+name);
System.out.println("school => "+school);
if(color == null) {
color = "없음";
}
System.out.println("color => " +color);
if(arr_food != null) {
for(int i=0; i<arr_food.length; i++) {
System.out.println("arr_food ("+i+") => " + arr_food(i));
}// end of for--------------
String likeFoodes = String.join(",", arr_food);
System.out.println("좋아하는 음식은 =>"+ likeFoodes);
}
else {
System.out.println("좋아하는 음식이 없습니다");
}
//*** 콘솔에 출력하기 끝 *** //
// **** 웹 브라우저에 출력하기 시작 **** //
//HttpServletResponse response 객체는 전송되어져온 데이터를 조작해서 결과물을 나타내고자 할 때 쓰인다.
response.setContentType("text/html; charset=UTF-8");
PrintWriter out = response.getWriter();
// out 은 웹브라우저에 기술하는 대상제라고 생각하자
out.println("<html>");
out.println("<head><title>개인성향 테스트 결과 화면</title></head>");
out.println("<body>");
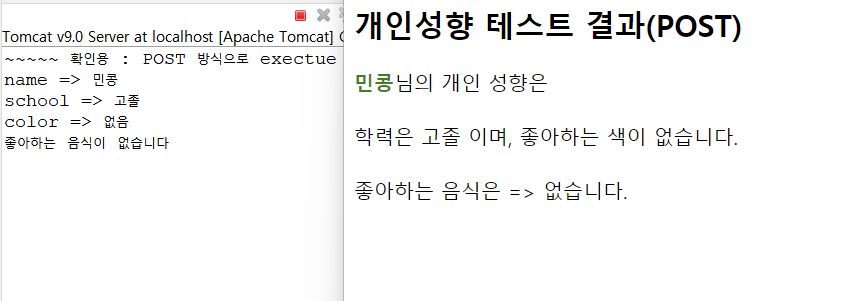
out.println("<h2>개인성향 테스트 결과(POST)</h2>");
out.printf("<span style="color: red; font-weight: bold;">%s</span>님의 개인 성향은<br><br>", name);
if(!"없음".equals(color)) {
out.printf("학력은 %s 이며, %s 색을 좋아합니다.<br><br>", school, color);
}
else {
out.printf("학력은 %s 이며, 좋아하는 색이 없습니다.<br><br>", school);
}
/*
%d ==> decimal 정수
%f ==> float 실수
%s ==> String 문자열
*/
String foodes = "";
if(arr_food != null) {
foodes = String.join(",",arr_food) + " 입니다.";
}
else {
foodes = "없습니다.";
}
out.println("좋아하는 음식은 => " + foodes);
out.println("</body>");
out.println("</html>");
// **** 웹 브라우저에 출력하기 끝 **** //
}
}===== 결과 =====
삼. 받다_우체국_방법 1
GET 과 POST 로 실험중 이부분만 변경해서 실험해봅시다
<form name="registerFrm" action="<%= ctxPath %>/03_getPostMethod.do" >   <!-- method 에 get을 쓰면 전송되어질 값이 보이고 post 를 쓰면 전송되어질 값이 안보인다. (method 생략시 같다.) -->
<%--
    <form name="registerFrm" action="<%= ctxPath %>/03_getPostMethod.do" method="Post">
--%>
===== jsp 전체 코드 =====
<%@ page language="java" contentType="text/html; charset=UTF-8"
pageEncoding="UTF-8"%>
<%
// 암기 하기
// 컨텍스트 패스명(context path name)을 알아오고자 한다.
String ctxPath = request.getContextPath();
System.out.println("ctxPath => " + ctxPath);
// 결과 : ctxPath => /JSPServletBegin <== WAS (톰켓서버) Document Base Path 설정의 기본값임.
// 톰켓에서 바꾼후 /aaa 로 결과
// 결과 : ctxPath => /aaa <== WAS (톰켓서버) Document Base Path 설정을 /aaa으로 변경한 경우.
// 톰켓에서 바꾼후 아무글자없는것으로 바꾼 결과
// 결과 : ctxPath => <== WAS (톰켓서버) Document Base Path 설정을 아무것도 없는것 또는 / 으로 변경한 경우.
// 기본 주소: http://localhost:9090/JSPServletBegin/chap02/01_getMethod.jsp
// 바꾸는 방법 : https://mdh2057.71
%>
<!DOCTYPE html>
<html>
<head>
<meta charset="UTF-8">
<title>form 태그의 GET/POSt 방식으로 데이터 전송하기</title>
<style type="text/css">
ul {
list-style-type: none;
}
li {
line-height: 200%;
}
</style>
<script type="text/javascript" src="http://mdh2057.m/<%= ctxPath %>/js/jquery-3.6.4.min.js"></script>
<script type="text/javascript">
$(document).ready(function(){
$("form(name="registerFrm")").submit(function(){
if($("input#name").val().trim() == "" ) { // 이름이 공백이라면
alert("성명은 필수항목 이오니 성명을 입력하세요!!");
return false; // return false; 이 submit(전송)을 하지 말라는 뜻이다.
}
});
});
</script>
</head>
<body>
<form name="registerFrm" action="<%= ctxPath %>/03_getPostMethod.do" > <!-- method 에 get을 쓰면 전송되어질 값이 보이고 post 를 쓰면 전송되어질 값이 안보인다. (method 생략시 같다.) -->
<%--
<form name="registerFrm" action="<%= ctxPath %>/03_getPostMethod.do" method="Post">
--%>
<%-- !!! 중요 !!! (암기 부분)
확장자가 .jsp 또는 .html 인 파일에서 URL 경로를 나타낼 때 맨 앞에 / 가 오면
그 앞에는 자동적으로 http://ip주소:포트번호 가 붙게 된다.
현재 <%= ctxPath %> 이 /JSPServletBegin 이므로 <%= ctxPath %>/01_getMethod.do 의 뜻은
http://localhost:9090/JSPServletBegin/01_getMethod.do 이라는 말이다.
--%>
<%--
form 태그에서 submit(전송)을 하면
http://localhost:9090/JSPServletBegin/01_getMethod.do 으로 데이터를 전송시킨다
만약에 mmethod를 생략하면 method="get" 으로 되어진다.
GET 방식은 웹브라우저 주소창에 http://URL주소?전송되어질데이터 와 같이 나타내주는 것이며 (? 가 나올시 GET 방식임을 기억하자)
? 를 중심으로 왼쪽은 사이트 URL 주소이며, 오른쪽은 전송되어질 데이터를 나타낸다.
전송되어질 데이터는 예를 들어 name=민콩&school=초대졸 와 같이 나오는데
& 는 데이터구분자 역할을 해준다.
GET 방식은 웹브라우저 주소창에 데이터 값을 공개하므로 보안성이 떨어지지만
그에 비해 POST 방식은 웹브라우저 주소창에 데어터값을 담는 것이 아니라 본문(body)에 데이터 값을 담아서 보내므로 보안성이 좋다.
그런데 속도측면에서는 POST 방식 보다는 GET 방식이 좀 더 빠르다!!! (김밥 예시 => GET 은 그냥 김밥줌 , POST 보안을 위해 포장지에 김밥을 주고 김밥을 먹으려면 포장지를 뜻어야함 )
그래서 일반적으로 보안과 관계없는 데이터조회(예: 물품정보 조회) 와 같은 select 절에서는 GET 방식을 주로 사용한다.
회원가입시 또는 회원정보변경시 입력되어질 데이터는 개인 정보이므로 보안성이 있어야 한다.
즉, insert 또는 update 와 같이 DML 작업은 일반적으로 POST 방식이 주로 사용된다.
--%>
<%--
submit(전송) 을 하면 <%= ctxPath %>/01_getMethod.do 로 보내어서 처리를 요청한다.
/JSPServletBegin/01_getMethod.do 은 누가 처리를 해주는지 배치서술자인 web.sml 에 기술해주어야 한다.
web.xml 에 가보면 <servlet-mapping> 에 URL 패턴으로 /01_getMethod.do 가 기술되어 있고
이어서 실제로 처리해주는 <servlet-class> 에 클래스명으로 chap02.GetMethod_01 이 기술되어 있다.
바로 이렇게 기술되어진 <servlet-class> 클래스명인 chap02.GetMethod_01 가 action 퍼리를 해주게 된다.
!!! 아주 중요한 것은 web.xml 파일을 언제 읽어들이느냐 하면
WAS가 구동(start) 가 되어질 때 web.xml 파일에 기술된 내용을 딱 1번만 읽어들어서 web.xml 파일에 기술된 내용대로 WAS가 작동하도록 되어진다.
그러므로 web.xml 파일에 내용을 추가하거나 삭제하는 등 변경되어지면 변경된 내용대ㅐ로 작동하기 위해서는 WAS를 반드시 껏다가 다시 켜애만 변경되어진 내용대로 작동된다. !!!!
--%>
<fieldset>
<legend>개인성향 테스트(GET/POST method)</legend>
<ul>
<li>
<label for="name">성명</label>
<input type="text" name="name" id="name" placeholder="성명입력"/>
</li>
<li>
<label for="school">학력</label>
<select name="school" id="school"> <!-- 관습상 id와 name 을 같게 한다. -->
<option >고졸</option> <!-- value 값이 주소로 넘어감 안쓰면 쓴 내용이 value 값으로 넘어감 지금은 고졸 아래줄은 초대줄 -->
<option >초대졸</option>
<option >대졸</option>
<option value="대학원졸">대학원졸</option>
</select>
</li>
<li>
<label for="">좋아하는 색상</label>
<div>
<label for="red">빨강</label>
<input type="radio" name="color" id="red" value="red" />
<label for="blue">파랑</label>
<input type="radio" name="color" id="blue" value="blue" />
<label for="green">초록</label>
<input type="radio" name="color" id="green" value="green" />
<label for="yellow">노랑</label>
<input type="radio" name="color" id="yellow" value="yellow" />
</div>
</li>
<li>
<label for="">좋아하는 음식(다중선택)</label>
<div>
<label for="food1">짜장면</label>
<input type="checkbox" name="food" id="food1" value="짜장면" />
<label for="food2">짬뽕</label>
<input type="checkbox" name="food" id="food2" value="짬뽕" />
<label for="food3">탕수육</label>
<input type="checkbox" name="food" id="food3" value="탕수육" />
<label for="food4">양장피</label>
<input type="checkbox" name="food" id="food4" value="양장피" />
<label for="food5">팔보채</label>
<input type="checkbox" name="food" id="food5" value="팔보채" />
</div>
</li>
<li>
<input type="submit" value="전송" />
<input type="reset" value="취소" />
</li>
</ul>
</fieldset>
</form>
</body>
</html>===== 전체 자바 코드 =====
package chap02;

import java.io.IOException;
import java.io.PrintWriter;

import javax.servlet.http.HttpServlet;
import javax.servlet.http.HttpServletRequest;
import javax.servlet.http.HttpServletResponse;

public class GetPostMethod_03 extends HttpServlet {

	/**
	 *
	 */
	private static final long serialVersionUID = 1L;


	@Override
	protected void doGet(HttpServletRequest request, HttpServletResponse response) throws IOException{

		execute(request, response);
	}


	@Override
	protected void doPost(HttpServletRequest request, HttpServletResponse response) throws IOException{

		execute(request, response);
	}


	protected void execute(HttpServletRequest request, HttpServletResponse response) throws IOException{

		String method = request.getMethod();    //form 태그에서 전송되어져온 method 방식을 알려주는 것이다.

		//System.out.println("method => " + method);
		// method => GET
		// method => POST

		if("GET".equals(method)) {
			System.out.println("~~~~~ 확인용 : GET 방식으로 exectue 메소드가 호출됨 ~~~~~");
		}
		else
		{
			System.out.println("~~~~~ 확인용 : POST 방식으로 exectue 메소드가 호출됨 ~~~~~");
		}

		/*
        post 방식으로 넘어온 데이터중 영어는 글자가 안깨지지만,
        한글은 글자모양이 깨져나온다.
        그래서  post 방식에서 넘어온 한글 데이터가 글자가 안깨지게 하려면
        아래처럼 request.setCharacterEncoding("UTF-8"); 을 해야 한다.
        주의할 것은 request.getParameter("변수명"); 보다 먼저 기술을 해주어야 한다는 것이다.
		 */

		request.setCharacterEncoding("UTF-8"); // 한글이 안깨지게 하기 위해


		// 첫번째 파라미터인 HttpServletRequest request 가 폼태그에서 전송되어져온 데이터를 처리해주는 용도로 쓰인다.
		String name = request.getParameter("name");     // !!!!!!!!! 암기하기 !!!!!!!!!   전 페이지에서 써준 이름의 값이 나온다
		String school = request.getParameter("school");   //    school 에 담겨진 값을 얻어온다.
		String color = request.getParameter("color");     //    color 에 담겨진 값을 얻어온다.
		String() arr_food = request.getParameterValues("food");    // 복수개 선택하는것을 배열로서 받아오는 것이다.


		//*** 콘솔에 출력하기 시작 *** //
	      System.out.println("name => "+name);
	      System.out.println("school => "+school);

	      if(color == null) {
	         color = "없음";
	      }

	      System.out.println("color => " +color);

	      if(arr_food != null) {

	         for(int i=0; i<arr_food.length; i++) {
	            System.out.println("arr_food ("+i+") => " + arr_food(i));
	         }// end of for--------------

	         String likeFoodes = String.join(",", arr_food);

	         System.out.println("좋아하는 음식은 =>"+ likeFoodes);

	      }
	      else {
	         System.out.println("좋아하는 음식이 없습니다");
	      }
	      //*** 콘솔에 출력하기 끝 *** //


		// **** 웹 브라우저에 출력하기 시작 **** //
		//HttpServletResponse response 객체는 전송되어져온 데이터를 조작해서 결과물을 나타내고자 할 때 쓰인다.
		response.setContentType("text/html; charset=UTF-8");

		PrintWriter out = response.getWriter();
		// out 은 웹브라우저에 기술하는 대상제라고 생각하자

		out.println("<html>");
		out.println("<head><title>개인성향 테스트 결과 화면</title></head>");
		out.println("<body>");
		out.println("<h2>개인성향 테스트 결과("+method+")</h2>");
		out.printf("<span style="color: green; font-weight: bold;">%s</span>님의 개인 성향은<br><br>", name);

		if(!"없음".equals(color)) {
			out.printf("학력은 %s 이며, %s 색을 좋아합니다.<br><br>", school, color);
		}
		else {
			out.printf("학력은 %s 이며, 좋아하는 색이 없습니다.<br><br>", school);
		}

		/*
		 	%d ==> decimal 정수
		 	%f ==> float   실수
		 	%s ==> String  문자열

		*/

		String foodes = "";

		if(arr_food != null) {
			foodes = String.join(",",arr_food) + " 입니다.";
		}
		else {
			foodes = "없습니다.";
		}

		out.println("좋아하는 음식은 => " + foodes);
		out.println("</body>");
		out.println("</html>");

		// **** 웹 브라우저에 출력하기 끝 **** //

	}


}
===== 4번까지의 모든 XML 코드에 영향을 미칩니다. =====
<?xml version="1.0" encoding="UTF-8"?>
<web-app xmlns:xsi="http://www.w3.org/2001/XMLSchema-instance" xmlns="http://xmlns.jcp.org/xml/ns/javaee" xsi:schemaLocation="http://xmlns.jcp.org/xml/ns/javaee http://xmlns.jcp.org/xml/ns/javaee/web-app_4_0.xsd" id="WebApp_ID" version="4.0">
  <display-name>JSPServletBegin</display-name>
  <welcome-file-list>
    <welcome-file>index.html</welcome-file>
    <welcome-file>index.jsp</welcome-file>
    <welcome-file>index.htm</welcome-file>
    <welcome-file>default.html</welcome-file>
    <welcome-file>default.jsp</welcome-file>
    <welcome-file>default.htm</welcome-file>
  </welcome-file-list>

  <servlet>
  	<servlet-name>01_GetMethod</servlet-name>
  	<servlet-class>chap02.GetMethod_01</servlet-class>   <!-- 요 클래스가 응답을 해준다. -->
  </servlet>

  <servlet-mapping>
  	<servlet-name>01_GetMethod</servlet-name>
  	<url-pattern>/01_getMethod.do</url-pattern>

  </servlet-mapping>
  <!--  === 중요 === (암기 부분)

		확장자가 .xml 또는 .java 인 파일에서 URL 경로를 나타낼 때 맨 앞에 / 가 오면
		그 앞에는 자동적으로 http://ip주소:포트번호/컨텍스트패스명 이 붙게 된다.

		현재 /JSPServletBegin/01_getMethod.do 이므로
		http://localhost:9090/JSPServletBegin/01_getMethod.do 이 된다.
  -->


   <servlet>
  	<servlet-name>02_postMethod</servlet-name>
  	<servlet-class>chap02.PostMethod_02</servlet-class>   <!-- 요 클래스가 응답을 해준다. -->
  </servlet>

  <servlet-mapping>
  	<servlet-name>02_postMethod</servlet-name>
  	<url-pattern>/02_postMethod.do</url-pattern>

  </servlet-mapping>


   <servlet>
  	<servlet-name>03_getPostMethod</servlet-name>
  	<servlet-class>chap02.GetPostMethod_03</servlet-class>   <!-- 요 클래스가 응답을 해준다. -->
  </servlet>

  <servlet-mapping>
  	<servlet-name>03_getPostMethod</servlet-name>
  	<url-pattern>/03_getPostMethod.do</url-pattern>

  </servlet-mapping>


  <servlet>
  	<servlet-name>04_getPostMethod</servlet-name>
  	<servlet-class>chap02.GetPostMethod_04</servlet-class>   <!-- 요 클래스가 응답을 해준다. -->
  </servlet>

  <servlet-mapping>
  	<servlet-name>04_getPostMethod</servlet-name>
  	<url-pattern>/04_getPostMethod.do</url-pattern>

  </servlet-mapping>

</web-app>
===== 결과 =====
4. 받다_우체국_방법-2
===== jsp 전체 코드 =====
<%@ page language="java" contentType="text/html; charset=UTF-8"
pageEncoding="UTF-8"%>
<%
// 암기 하기
// 컨텍스트 패스명(context path name)을 알아오고자 한다.
String ctxPath = request.getContextPath();
System.out.println("ctxPath => " + ctxPath);
// 결과 : ctxPath => /JSPServletBegin <== WAS (톰켓서버) Document Base Path 설정의 기본값임.
// 톰켓에서 바꾼후 /aaa 로 결과
// 결과 : ctxPath => /aaa <== WAS (톰켓서버) Document Base Path 설정을 /aaa으로 변경한 경우.
// 톰켓에서 바꾼후 아무글자없는것으로 바꾼 결과
// 결과 : ctxPath => <== WAS (톰켓서버) Document Base Path 설정을 아무것도 없는것 또는 / 으로 변경한 경우.
// 기본 주소: http://localhost:9090/JSPServletBegin/chap02/01_getMethod.jsp
// 바꾸는 방법 : https://mdh2057.71
%>
<!DOCTYPE html>
<html>
<head>
<meta charset="UTF-8">
<title>form 태그의 GET/POSt 방식으로 데이터 전송하기</title>
<style type="text/css">
ul {
list-style-type: none;
}
li {
line-height: 200%;
}
</style>
<script type="text/javascript" src="http://mdh2057.m/<%= ctxPath %>/js/jquery-3.6.4.min.js"></script>
<script type="text/javascript">
$(document).ready(function(){
$("form(name="registerFrm")").submit(function(){
if($("input#name").val().trim() == "" ) { // 이름이 공백이라면
alert("성명은 필수항목 이오니 성명을 입력하세요!!");
return false; // return false; 이 submit(전송)을 하지 말라는 뜻이다.
}
});
});
</script>
</head>
<body>
<form name="registerFrm" action="<%= ctxPath %>/04_getPostMethod.do"> <!-- method 에 get을 쓰면 전송되어질 값이 보이고 post 를 쓰면 전송되어질 값이 안보인다. (method 생략시 같다.) -->
<%--
<form name="registerFrm" action="<%= ctxPath %>/04_getPostMethod.do" method="Post">
--%>
<%-- !!! 중요 !!! (암기 부분)
확장자가 .jsp 또는 .html 인 파일에서 URL 경로를 나타낼 때 맨 앞에 / 가 오면
그 앞에는 자동적으로 http://ip주소:포트번호 가 붙게 된다.
현재 <%= ctxPath %> 이 /JSPServletBegin 이므로 <%= ctxPath %>/01_getMethod.do 의 뜻은
http://localhost:9090/JSPServletBegin/01_getMethod.do 이라는 말이다.
--%>
<%--
form 태그에서 submit(전송)을 하면
http://localhost:9090/JSPServletBegin/01_getMethod.do 으로 데이터를 전송시킨다
만약에 mmethod를 생략하면 method="get" 으로 되어진다.
GET 방식은 웹브라우저 주소창에 http://URL주소?전송되어질데이터 와 같이 나타내주는 것이며 (? 가 나올시 GET 방식임을 기억하자)
? 를 중심으로 왼쪽은 사이트 URL 주소이며, 오른쪽은 전송되어질 데이터를 나타낸다.
전송되어질 데이터는 예를 들어 name=민콩&school=초대졸 와 같이 나오는데
& 는 데이터구분자 역할을 해준다.
GET 방식은 웹브라우저 주소창에 데이터 값을 공개하므로 보안성이 떨어지지만
그에 비해 POST 방식은 웹브라우저 주소창에 데어터값을 담는 것이 아니라 본문(body)에 데이터 값을 담아서 보내므로 보안성이 좋다.
그런데 속도측면에서는 POST 방식 보다는 GET 방식이 좀 더 빠르다!!! (김밥 예시 => GET 은 그냥 김밥줌 , POST 보안을 위해 포장지에 김밥을 주고 김밥을 먹으려면 포장지를 뜻어야함 )
그래서 일반적으로 보안과 관계없는 데이터조회(예: 물품정보 조회) 와 같은 select 절에서는 GET 방식을 주로 사용한다.
회원가입시 또는 회원정보변경시 입력되어질 데이터는 개인 정보이므로 보안성이 있어야 한다.
즉, insert 또는 update 와 같이 DML 작업은 일반적으로 POST 방식이 주로 사용된다.
--%>
<%--
submit(전송) 을 하면 <%= ctxPath %>/01_getMethod.do 로 보내어서 처리를 요청한다.
/JSPServletBegin/01_getMethod.do 은 누가 처리를 해주는지 배치서술자인 web.sml 에 기술해주어야 한다.
web.xml 에 가보면 <servlet-mapping> 에 URL 패턴으로 /01_getMethod.do 가 기술되어 있고
이어서 실제로 처리해주는 <servlet-class> 에 클래스명으로 chap02.GetMethod_01 이 기술되어 있다.
바로 이렇게 기술되어진 <servlet-class> 클래스명인 chap02.GetMethod_01 가 action 퍼리를 해주게 된다.
!!! 아주 중요한 것은 web.xml 파일을 언제 읽어들이느냐 하면
WAS가 구동(start) 가 되어질 때 web.xml 파일에 기술된 내용을 딱 1번만 읽어들어서 web.xml 파일에 기술된 내용대로 WAS가 작동하도록 되어진다.
그러므로 web.xml 파일에 내용을 추가하거나 삭제하는 등 변경되어지면 변경된 내용대ㅐ로 작동하기 위해서는 WAS를 반드시 껏다가 다시 켜애만 변경되어진 내용대로 작동된다. !!!!
--%>
<fieldset>
<legend>개인성향 테스트(GET/POST method)</legend>
<ul>
<li>
<label for="name">성명</label>
<input type="text" name="name" id="name" placeholder="성명입력"/>
</li>
<li>
<label for="school">학력</label>
<select name="school" id="school"> <!-- 관습상 id와 name 을 같게 한다. -->
<option >고졸</option> <!-- value 값이 주소로 넘어감 안쓰면 쓴 내용이 value 값으로 넘어감 지금은 고졸 아래줄은 초대줄 -->
<option >초대졸</option>
<option >대졸</option>
<option value="대학원졸">대학원졸</option>
</select>
</li>
<li>
<label for="">좋아하는 색상</label>
<div>
<label for="red">빨강</label>
<input type="radio" name="color" id="red" value="red" />
<label for="blue">파랑</label>
<input type="radio" name="color" id="blue" value="blue" />
<label for="green">초록</label>
<input type="radio" name="color" id="green" value="green" />
<label for="yellow">노랑</label>
<input type="radio" name="color" id="yellow" value="yellow" />
</div>
</li>
<li>
<label for="">좋아하는 음식(다중선택)</label>
<div>
<label for="food1">짜장면</label>
<input type="checkbox" name="food" id="food1" value="짜장면" />
<label for="food2">짬뽕</label>
<input type="checkbox" name="food" id="food2" value="짬뽕" />
<label for="food3">탕수육</label>
<input type="checkbox" name="food" id="food3" value="탕수육" />
<label for="food4">양장피</label>
<input type="checkbox" name="food" id="food4" value="양장피" />
<label for="food5">팔보채</label>
<input type="checkbox" name="food" id="food5" value="팔보채" />
</div>
</li>
<li>
<input type="submit" value="전송" />
<input type="reset" value="취소" />
</li>
</ul>
</fieldset>
</form>
</body>
</html>===== 전체 자바 코드 =====
package chap02;

import java.io.IOException;
import java.io.PrintWriter;

import javax.servlet.http.HttpServlet;
import javax.servlet.http.HttpServletRequest;
import javax.servlet.http.HttpServletResponse;

public class GetPostMethod_04 extends HttpServlet {

	/**
	 *
	 */
	private static final long serialVersionUID = 1L;


	@Override
	protected void doGet(HttpServletRequest request, HttpServletResponse response) throws IOException{


		String method = request.getMethod();    //form 태그에서 전송되어져온 method 방식을 알려주는 것이다.

		//System.out.println("method => " + method);
		// method => GET
		// method => POST

		if("GET".equals(method)) {
			System.out.println("~~~~~ 확인용 : GET 방식으로 exectue 메소드가 호출됨 ~~~~~");
		}
		else
		{
			System.out.println("~~~~~ 확인용 : POST 방식으로 exectue 메소드가 호출됨 ~~~~~");
		}

		/*
        post 방식으로 넘어온 데이터중 영어는 글자가 안깨지지만,
        한글은 글자모양이 깨져나온다.
        그래서  post 방식에서 넘어온 한글 데이터가 글자가 안깨지게 하려면
        아래처럼 request.setCharacterEncoding("UTF-8"); 을 해야 한다.
        주의할 것은 request.getParameter("변수명"); 보다 먼저 기술을 해주어야 한다는 것이다.
		 */

		request.setCharacterEncoding("UTF-8"); // 한글이 안깨지게 하기 위해


		// 첫번째 파라미터인 HttpServletRequest request 가 폼태그에서 전송되어져온 데이터를 처리해주는 용도로 쓰인다.
		String name = request.getParameter("name");     // !!!!!!!!! 암기하기 !!!!!!!!!   전 페이지에서 써준 이름의 값이 나온다
		String school = request.getParameter("school");   //    school 에 담겨진 값을 얻어온다.
		String color = request.getParameter("color");     //    color 에 담겨진 값을 얻어온다.
		String() arr_food = request.getParameterValues("food");    // 복수개 선택하는것을 배열로서 받아오는 것이다.


		//*** 콘솔에 출력하기 시작 *** //
	      System.out.println("name => "+name);
	      System.out.println("school => "+school);

	      if(color == null) {
	         color = "없음";
	      }

	      System.out.println("color => " +color);

	      if(arr_food != null) {

	         for(int i=0; i<arr_food.length; i++) {
	            System.out.println("arr_food ("+i+") => " + arr_food(i));
	         }// end of for--------------

	         String likeFoodes = String.join(",", arr_food);

	         System.out.println("좋아하는 음식은 =>"+ likeFoodes);

	      }
	      else {
	         System.out.println("좋아하는 음식이 없습니다");
	      }
	      //*** 콘솔에 출력하기 끝 *** //


		// **** 웹 브라우저에 출력하기 시작 **** //
		//HttpServletResponse response 객체는 전송되어져온 데이터를 조작해서 결과물을 나타내고자 할 때 쓰인다.
		response.setContentType("text/html; charset=UTF-8");

		PrintWriter out = response.getWriter();
		// out 은 웹브라우저에 기술하는 대상제라고 생각하자

		out.println("<html>");
		out.println("<head><title>개인성향 테스트 결과 화면</title></head>");
		out.println("<body>");
		out.println("<h2>개인성향 테스트 결과("+method+")</h2>");
		out.printf("<span style="color: yellow; font-weight: bold;">%s</span>님의 개인 성향은<br><br>", name);

		if(!"없음".equals(color)) {
			out.printf("학력은 %s 이며, %s 색을 좋아합니다.<br><br>", school, color);
		}
		else {
			out.printf("학력은 %s 이며, 좋아하는 색이 없습니다.<br><br>", school);
		}

		/*
		 	%d ==> decimal 정수
		 	%f ==> float   실수
		 	%s ==> String  문자열

		*/

		String foodes = "";

		if(arr_food != null) {
			foodes = String.join(",",arr_food) + " 입니다.";
		}
		else {
			foodes = "없습니다.";
		}

		out.println("좋아하는 음식은 => " + foodes);
		out.println("</body>");
		out.println("</html>");

		// **** 웹 브라우저에 출력하기 끝 **** //

	}


	@Override
	protected void doPost(HttpServletRequest request, HttpServletResponse response) throws IOException{

		doGet(request, response);   // post 호출시 doGet 을 실행한다.
	}


}
===== 결과 =====

5. 받다_우체국_방법-3
web.xml을 설명하지 않고 시도
http://localhost:9090/JSPServletBegin/05_getPostMethod.do를 처리하는 서블릿은 GetPostMethod_05입니다.
@WebServlet(“/05_getPostMethod.do”)
또한 WAS를 사용하는 경우 껐다가 다시 켜야 합니다(이유: 실행 중에 WAS를 읽기 때문입니다).
===== jsp 전체 코드 =====
===== 전체 자바 코드 =====
===== 결과 =====
6. 받다_우체국_방법-4
POST, GET 변경시 한글 깨짐을 방지하여 매번 코드에 넣지 않고 필터에 한번만 넣으면 됩니다.
필터는 Servlet 2.3 버전에서 추가되었으며,
서블릿이 클라이언트의 요청을 받기 전에 차단 필터에 있는 작업을 수행하는 것을 의미합니다.
필터를 사용하면 클라이언트의 요청을 가로채고 서버 구성 요소의 추가 기능을 실행할 수 있습니다.
<< Anwendungsreihenfolge filtern >>
1. 필터 인터페이스를 구현하는 Java 클래스를 생성합니다.
2. 필터 클래스는 /WEB-INF/web.xml의 필터 요소를 이용하여 등록하는데 web.xml을 사용하지 않고 @WebFilter 어노테이션을 사용하는 경우가 많다.
===== 전체 코드 필터링 =====
package my.filter;

import java.io.IOException;
import javax.servlet.Filter;
import javax.servlet.FilterChain;
import javax.servlet.FilterConfig;
import javax.servlet.ServletException;
import javax.servlet.ServletRequest;
import javax.servlet.ServletResponse;
import javax.servlet.annotation.WebFilter;
import javax.servlet.http.HttpFilter;

/**
 * Servlet Filter implementation class EncodeFilter
 */


/*
	필터란 Servlet 2.3 버전에 추가된 것으로,
	클라이언트의 요청을 서블릿이 받기 전에 가로채어 필터에 작성된 내용을 수행하는 것을 말한다.
	따라서 필터를 사용하면 클라이언트의 요청을 가로채서 서버 컴포넌트의 추가적인 다른 기능을 수행시킬 수 있다.

	<< 필터 적용 순서 >>
	1. Filter 인터페이스를 구현하는 자바 클래스를 생성.
	2. /WEB-INF/web.xml 에 filter 엘리먼트를 사용하여 필터 클래스를 등록하는데
	     하지만 web.xml 을 사용하지 않고 @WebFilter 어노테이션을 많이 사용한다.
*/


@WebFilter("/*")
public class EncodeFilter extends HttpFilter implements Filter {

    /**
	 *
	 */
	private static final long serialVersionUID = 1L;

	/**
     * @see HttpFilter#HttpFilter()
     */
    public EncodeFilter() {
        super();
        // TODO Auto-generated constructor stub
    }

	/**
	 * @see Filter#destroy()
	 */
	public void destroy() {
		// TODO Auto-generated method stub
		// 필터 인스턴스를 종료시키기 전에 호출하는 메소드
	}

	/**
	 * @see Filter#doFilter(ServletRequest, ServletResponse, FilterChain)
	 */
	public void doFilter(ServletRequest request, ServletResponse response, FilterChain chain) throws IOException, ServletException {
		// TODO Auto-generated method stub
		// place your code here

		// 필터의 로직을 작성하는 메소드
		/*
	        post 방식으로 넘어온 데이터중 영어는 글자가 안깨지지만,
	        한글은 글자모양이 깨져나온다.
	        그래서  post 방식에서 넘어온 한글 데이터가 글자가 안깨지게 하려면
	        아래처럼 request.setCharacterEncoding("UTF-8"); 을 해야 한다.
	        주의할 것은 request.getParameter("변수명"); 보다 먼저 기술을 해주어야 한다는 것이다.
		 */

		request.setCharacterEncoding("UTF-8"); // 한글이 안깨지게 하기 위해


		// pass the request along the filter chain
		chain.doFilter(request, response);
	}

	/**
	 * @see Filter#init(FilterConfig)
	 */
	public void init(FilterConfig fConfig) throws ServletException {
		// TODO Auto-generated method stub
		// 서블릿 컨테이너가 필터 인스턴스를 초기화 하기 위해서 호출하는 메소드
		// 여기는 기술할 필요가 없다.
	}

}
===== jsp 전체 코드 =====
<%@ page language="java" contentType="text/html; charset=UTF-8"
pageEncoding="UTF-8"%>
<%
// 암기 하기
// 컨텍스트 패스명(context path name)을 알아오고자 한다.
String ctxPath = request.getContextPath();
System.out.println("ctxPath => " + ctxPath);
// 결과 : ctxPath => /JSPServletBegin <== WAS (톰켓서버) Document Base Path 설정의 기본값임.
// 톰켓에서 바꾼후 /aaa 로 결과
// 결과 : ctxPath => /aaa <== WAS (톰켓서버) Document Base Path 설정을 /aaa으로 변경한 경우.
// 톰켓에서 바꾼후 아무글자없는것으로 바꾼 결과
// 결과 : ctxPath => <== WAS (톰켓서버) Document Base Path 설정을 아무것도 없는것 또는 / 으로 변경한 경우.
// 기본 주소: http://localhost:9090/JSPServletBegin/chap02/01_getMethod.jsp
// 바꾸는 방법 : https://mdh2057.71
%>
<!DOCTYPE html>
<html>
<head>
<meta charset="UTF-8">
<title>form 태그의 GET/POSt 방식으로 데이터 전송하기</title>
<style type="text/css">
ul {
list-style-type: none;
}
li {
line-height: 200%;
}
</style>
<script type="text/javascript" src="http://mdh2057.m/<%= ctxPath %>/js/jquery-3.6.4.min.js"></script>
<script type="text/javascript">
$(document).ready(function(){
$("form(name="registerFrm")").submit(function(){
if($("input#name").val().trim() == "" ) { // 이름이 공백이라면
alert("성명은 필수항목 이오니 성명을 입력하세요!!");
return false; // return false; 이 submit(전송)을 하지 말라는 뜻이다.
}
});
});
</script>
</head>
<body>
<form name="registerFrm" action="<%= ctxPath %>/06_getPostMethod.do" method="Post"> <!-- method 에 get을 쓰면 전송되어질 값이 보이고 post 를 쓰면 전송되어질 값이 안보인다. (method 생략시 같다.) -->
<%--
<form name="registerFrm" action="<%= ctxPath %>/06_getPostMethod.do" method="Post">
--%>
<%-- !!! 중요 !!! (암기 부분)
확장자가 .jsp 또는 .html 인 파일에서 URL 경로를 나타낼 때 맨 앞에 / 가 오면
그 앞에는 자동적으로 http://ip주소:포트번호 가 붙게 된다.
현재 <%= ctxPath %> 이 /JSPServletBegin 이므로 <%= ctxPath %>/01_getMethod.do 의 뜻은
http://localhost:9090/JSPServletBegin/01_getMethod.do 이라는 말이다.
--%>
<%--
form 태그에서 submit(전송)을 하면
http://localhost:9090/JSPServletBegin/01_getMethod.do 으로 데이터를 전송시킨다
만약에 mmethod를 생략하면 method="get" 으로 되어진다.
GET 방식은 웹브라우저 주소창에 http://URL주소?전송되어질데이터 와 같이 나타내주는 것이며 (? 가 나올시 GET 방식임을 기억하자)
? 를 중심으로 왼쪽은 사이트 URL 주소이며, 오른쪽은 전송되어질 데이터를 나타낸다.
전송되어질 데이터는 예를 들어 name=민콩&school=초대졸 와 같이 나오는데
& 는 데이터구분자 역할을 해준다.
GET 방식은 웹브라우저 주소창에 데이터 값을 공개하므로 보안성이 떨어지지만
그에 비해 POST 방식은 웹브라우저 주소창에 데어터값을 담는 것이 아니라 본문(body)에 데이터 값을 담아서 보내므로 보안성이 좋다.
그런데 속도측면에서는 POST 방식 보다는 GET 방식이 좀 더 빠르다!!! (김밥 예시 => GET 은 그냥 김밥줌 , POST 보안을 위해 포장지에 김밥을 주고 김밥을 먹으려면 포장지를 뜻어야함 )
그래서 일반적으로 보안과 관계없는 데이터조회(예: 물품정보 조회) 와 같은 select 절에서는 GET 방식을 주로 사용한다.
회원가입시 또는 회원정보변경시 입력되어질 데이터는 개인 정보이므로 보안성이 있어야 한다.
즉, insert 또는 update 와 같이 DML 작업은 일반적으로 POST 방식이 주로 사용된다.
--%>
<%--
submit(전송) 을 하면 <%= ctxPath %>/01_getMethod.do 로 보내어서 처리를 요청한다.
/JSPServletBegin/01_getMethod.do 은 누가 처리를 해주는지 배치서술자인 web.sml 에 기술해주어야 한다.
web.xml 에 가보면 <servlet-mapping> 에 URL 패턴으로 /01_getMethod.do 가 기술되어 있고
이어서 실제로 처리해주는 <servlet-class> 에 클래스명으로 chap02.GetMethod_01 이 기술되어 있다.
바로 이렇게 기술되어진 <servlet-class> 클래스명인 chap02.GetMethod_01 가 action 퍼리를 해주게 된다.
!!! 아주 중요한 것은 web.xml 파일을 언제 읽어들이느냐 하면
WAS가 구동(start) 가 되어질 때 web.xml 파일에 기술된 내용을 딱 1번만 읽어들어서 web.xml 파일에 기술된 내용대로 WAS가 작동하도록 되어진다.
그러므로 web.xml 파일에 내용을 추가하거나 삭제하는 등 변경되어지면 변경된 내용대ㅐ로 작동하기 위해서는 WAS를 반드시 껏다가 다시 켜애만 변경되어진 내용대로 작동된다. !!!!
--%>
<fieldset>
<legend>개인성향 테스트(GET/POST method)</legend>
<ul>
<li>
<label for="name">성명</label>
<input type="text" name="name" id="name" placeholder="성명입력"/>
</li>
<li>
<label for="school">학력</label>
<select name="school" id="school"> <!-- 관습상 id와 name 을 같게 한다. -->
<option >고졸</option> <!-- value 값이 주소로 넘어감 안쓰면 쓴 내용이 value 값으로 넘어감 지금은 고졸 아래줄은 초대줄 -->
<option >초대졸</option>
<option >대졸</option>
<option value="대학원졸">대학원졸</option>
</select>
</li>
<li>
<label for="">좋아하는 색상</label>
<div>
<label for="red">빨강</label>
<input type="radio" name="color" id="red" value="red" />
<label for="blue">파랑</label>
<input type="radio" name="color" id="blue" value="blue" />
<label for="green">초록</label>
<input type="radio" name="color" id="green" value="green" />
<label for="yellow">노랑</label>
<input type="radio" name="color" id="yellow" value="yellow" />
</div>
</li>
<li>
<label for="">좋아하는 음식(다중선택)</label>
<div>
<label for="food1">짜장면</label>
<input type="checkbox" name="food" id="food1" value="짜장면" />
<label for="food2">짬뽕</label>
<input type="checkbox" name="food" id="food2" value="짬뽕" />
<label for="food3">탕수육</label>
<input type="checkbox" name="food" id="food3" value="탕수육" />
<label for="food4">양장피</label>
<input type="checkbox" name="food" id="food4" value="양장피" />
<label for="food5">팔보채</label>
<input type="checkbox" name="food" id="food5" value="팔보채" />
</div>
</li>
<li>
<input type="submit" value="전송" />
<input type="reset" value="취소" />
</li>
</ul>
</fieldset>
</form>
</body>
</html>===== 전체 자바 코드 =====
package chap02;

import java.io.IOException;
import java.io.PrintWriter;

import javax.servlet.ServletException;
import javax.servlet.annotation.WebServlet;
import javax.servlet.http.HttpServlet;
import javax.servlet.http.HttpServletRequest;
import javax.servlet.http.HttpServletResponse;

@WebServlet("/06_getPostMethod.do")
public class GetPostMethod_06 extends HttpServlet {
	private static final long serialVersionUID = 1L;


	protected void doGet(HttpServletRequest request, HttpServletResponse response) throws ServletException, IOException {

		//response.getWriter().append("Served at: ").append(request.getContextPath());
		// 웹브라우저에 덧붙인다. request.getContextPath() 는 컨테스트패스를 찍어준다.

		String method = request.getMethod();    //form 태그에서 전송되어져온 method 방식을 알려주는 것이다.

		//System.out.println("method => " + method);
		// method => GET
		// method => POST

		if("GET".equals(method)) {
			System.out.println("~~~~~ 확인용 : GET 방식으로 exectue 메소드가 호출됨 ~~~~~");
		}
		else
		{
			System.out.println("~~~~~ 확인용 : POST 방식으로 exectue 메소드가 호출됨 ~~~~~");
		}

		//request.setCharacterEncoding("UTF-8"); 를 주석처리한다.
		// 왜냐하면 필터 my.filter.EncodeFilter 에 적용된 request.setCharacterEncoding("UTF-8"); 이것을 사용하기 때문이다.

		// 첫번째 파라미터인 HttpServletRequest request 가 폼태그에서 전송되어져온 데이터를 처리해주는 용도로 쓰인다.
		String name = request.getParameter("name");     // !!!!!!!!! 암기하기 !!!!!!!!!   전 페이지에서 써준 이름의 값이 나온다
		String school = request.getParameter("school");   //    school 에 담겨진 값을 얻어온다.
		String color = request.getParameter("color");     //    color 에 담겨진 값을 얻어온다.
		String() arr_food = request.getParameterValues("food");    // 복수개 선택하는것을 배열로서 받아오는 것이다.


		//*** 콘솔에 출력하기 시작 *** //
	      System.out.println("name => "+name);
	      System.out.println("school => "+school);

	      if(color == null) {
	         color = "없음";
	      }

	      System.out.println("color => " +color);

	      if(arr_food != null) {

	         for(int i=0; i<arr_food.length; i++) {
	            System.out.println("arr_food ("+i+") => " + arr_food(i));
	         }// end of for--------------

	         String likeFoodes = String.join(",", arr_food);

	         System.out.println("좋아하는 음식은 =>"+ likeFoodes);

	      }
	      else {
	         System.out.println("좋아하는 음식이 없습니다");
	      }
	      //*** 콘솔에 출력하기 끝 *** //


		// **** 웹 브라우저에 출력하기 시작 **** //
		//HttpServletResponse response 객체는 전송되어져온 데이터를 조작해서 결과물을 나타내고자 할 때 쓰인다.
		response.setContentType("text/html; charset=UTF-8");

		PrintWriter out = response.getWriter();
		// out 은 웹브라우저에 기술하는 대상제라고 생각하자

		out.println("<html>");
		out.println("<head><title>개인성향 테스트 결과 화면</title></head>");
		out.println("<body>");
		out.println("<h2>개인성향 테스트 결과("+method+")</h2>");
		out.printf("<span style="color: orange; font-weight: bold;">%s</span>님의 개인 성향은<br><br>", name);

		if(!"없음".equals(color)) {
			out.printf("학력은 %s 이며, %s 색을 좋아합니다.<br><br>", school, color);
		}
		else {
			out.printf("학력은 %s 이며, 좋아하는 색이 없습니다.<br><br>", school);
		}

		/*
		 	%d ==> decimal 정수
		 	%f ==> float   실수
		 	%s ==> String  문자열

		*/

		String foodes = "";

		if(arr_food != null) {
			foodes = String.join(",",arr_food) + " 입니다.";
		}
		else {
			foodes = "없습니다.";
		}

		out.println("좋아하는 음식은 => " + foodes);
		out.println("</body>");
		out.println("</html>");

		// **** 웹 브라우저에 출력하기 끝 **** //
	}


	protected void doPost(HttpServletRequest request, HttpServletResponse response) throws ServletException, IOException {

		doGet(request, response);
	}

}
===== 결과 =====

7. 포함(중요)
include를 사용하여 중복 파일을 단일 파일로 가져옵니다.
행동이란 무엇입니까?
— XML 기술을 사용하여 기존 JSP 문법을 확장하는 메커니즘으로 JSP 사양에 명시되어 있습니다.
정해진 능력치입니다.
이것은 XML 태그이기 때문에 작업 태그라고도 합니다.
그냥 액션이라고 합니다.
이는 이러한 태그가 특정 작업을 수행하는 역할을 하기 때문입니다.
※ 2가지 액션
1) 기본 조치
=> JSP 페이지에서 바로 사용할 수 있습니다.
2) 커스텀 액션
=> 별도의 라이브러리 설치 후 사용 가능합니다.
라이브러리는 인터넷(JSTL)에서 다운로드할 수 있습니다.
사용자가 직접 만들 수도 있습니다.
※ 스탠다드 액션과 커스텀 액션의 외형 차이
1. 기본 조치
모든 태그의 이름 앞에 JSP 접두어.
예)
2. 커스텀 액션
모든 태그의 이름 앞에 JSP 접두사와 다른 이름으로
예) 바르=”cnt” 값=”0″ />
※ 액션은 HTML 태그와 다릅니다.
– 액션 태그는 HTML 태그와 매우 유사해 보이지만
HTML 태그처럼 클라이언트의 웹 브라우저에 직접 전달되지 않습니다.
웹 컨테이너(Tomcat 서버) 측에서 실행되며 결과만 클라이언트의 웹 브라우저에 표시됩니다.
※ 디폴트 액션으로 할 수 있는 것
==> 다음과 같은 기본 작업 사용
Java의 include() 및 forward() 메서드와 동일한 기능을 구현할 수 있습니다.
==> 기본 동작이 마음에 든다면
자바 코드를 작성하지 않고
JavaBean(JavaBean 사양에 따라 구축된 Java 클래스)을 생성하여 사용할 수 있습니다.
※
==> JavaBeans의 객체화 후에 이 객체를 어디까지 사용해야 하는지 결정해야 합니다.
1. 범위=”페이지”
– 범위 속성의 기본값이므로 별도로 지정하지 않는 한 이 값이 적용됩니다.
이 객체는 요청된 JSP 페이지 내에서만 사용되며 실행 종료 시 자동 소멸된다.
따라서 다른 JSP 페이지에서는 사용할 수 없습니다.
이 객체도 요청된 JSP 페이지가 호출될 때마다 생성됩니다.
2. 범위 = “요청”
– 이 객체가 요청된 JSP 페이지에서 사용된 후에는 이 JSP 페이지에 연결된 다른 JSP 페이지에서도 사용됩니다.
연결된 다른 JSP 페이지에서 실행이 종료되면 개체가 자동으로 소멸됩니다.
이 객체가 요청 영역에 있으면 생성된 객체가 사용되고, 그렇지 않으면 새 객체가 생성되어 요청 영역에 배치됩니다.
3. 영역 = “세션”
– 이 객체는 세션이 종료(소멸)될 때까지 소멸되지 않고 사용됩니다.
세션이 종료(소멸)되는 즉시 이 객체는 자동으로 소멸됩니다.
이 개체가 세션 범위에 있으면 생성된 개체가 사용되고, 없으면 새 개체가 생성되어 세션 범위에 배치됩니다.
4. 범위 = “응용 프로그램”
– 이 객체는 웹 애플리케이션이 종료될 때까지 파기 없이 사용됩니다.
이 개체는 웹 응용 프로그램이 닫히면 자동으로 소멸됩니다.
웹 애플리케이션에서 일반적으로 사용되는 객체여야 합니다.
이 개체가 범위에 있으면 생성된 개체가 사용되고, 그렇지 않으면 새 개체가 생성되어 범위에 배치됩니다.
여기에서 이 두 부분의 차이점을 알아야 합니다.
<div style="margin: 20px 0;">
    <%-- <%@ include file="01_include.jsp" %> --%>     <!-- 01_include 파일 실행  -->
</div>										<!-- 이것은 파일 전체가 다 들어온다.  -->

<div style="margin: 20px 0;">
    <jsp:include page="01_include.jsp" />  <!-- jsp 표준액션 : 이것은 결과물만 가져온다. -->
</div>
===== jsp 전체 코드 =====
<%@ page language="java" contentType="text/html; charset=UTF-8"
pageEncoding="UTF-8"%>
<%@ page import="java.util.Date" %>
<%
//**** 현재시각을 알아오기 ***** //
Date now = new Date(); // 현재시각
String currentTime = String.format("%tF %tT %tA", now,now,now); // 연월일, 시분초, 요일
int price = 0;
%>
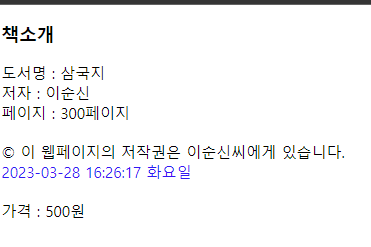
© 이 웹페이지의 저작권은 이순신씨에게 있습니다. <br>
<span style="color: blue; font-weight: blod;"><%= currentTime %></span>===== jsp의 전체 코드 #2 =====
<%@ page language="java" contentType="text/html; charset=UTF-8"
    pageEncoding="UTF-8"%>

<%
	int price = 500;
%>

<!DOCTYPE html>
<html>
<head>
<meta charset="UTF-8">
<title>JSP 표준액션 중 include 에 대해서 알아봅니다.</title>
</head>
<body>
	<h3>책소개</h3>
	도서명 : 삼국지<br/>
	저자 : 이순신<br/>
	페이지 : 300페이지<br/>
	<div style="margin: 20px 0;">
		<%-- <%@ include file="01_include.jsp" %> --%>     <!-- 01_include 파일 실행  -->
	</div>										<!-- 이것은 파일 전체가 다 들어온다.  -->

	<div style="margin: 20px 0;">
		<jsp:include page="01_include.jsp" />  <!-- jsp 표준액션 : 이것은 결과물만 가져온다. -->
	</div>

	가격 : <%= price %>원 <br/>

</body>
</html>
===== 결과 =====
8일. 포함 HTML에서 JSP로
헤더와 푸터(중복 부분)를 include로 따로 생성하자
===== 색인 JSP 전체 코드 =====
<%@ page language="java" contentType="text/html; charset=UTF-8"
pageEncoding="UTF-8"%>
<jsp:include page="header.jsp" />
<!-- 상단 컨텐츠 시작 -->
<div class="row custom-topcontents">
<div class="col-md-3">
<h2>Getting started</h2>
<p>An overview of Bootstrap, how to download and use, basic
templates and examples, and more.</p>
<p>
<a class="btn btn-primary btn-lg">Learn more »</a>
</p>
</div>
<div class="col-md-9">
<div id="carouselExampleIndicators" class="carousel slide" data-ride="carousel">
<ol class="carousel-indicators">
<li data-target="#carouselExampleIndicators" data-slide-to="0" class="active"></li>
<li data-target="#carouselExampleIndicators" data-slide-to="1"></li>
<li data-target="#carouselExampleIndicators" data-slide-to="2"></li>
</ol>
<div class="carousel-inner">
<div class="carousel-item active">
<img src="http://mdh2057.m/images/Koala.jpg" class="d-block w-100" alt="...">
<div class="carousel-caption d-none d-md-block">
<h5>Koala</h5>
<p>Koala Content</p>
</div>
</div>
<div class="carousel-item">
<img src="images/Lighthouse.jpg" class="d-block w-100" alt="...">
<div class="carousel-caption d-none d-md-block">
<h5>Lighthouse</h5>
<p>Lighthouse Content</p>
</div>
</div>
<div class="carousel-item">
<img src="images/Penguins.jpg" class="d-block w-100" alt="...">
<div class="carousel-caption d-none d-md-block">
<h5>Penguins</h5>
<p>Penguins Content</p>
</div>
</div>
</div>
<a class="carousel-control-prev" href="#carouselExampleIndicators" role="button" data-slide="prev">
<span class="carousel-control-prev-icon" aria-hidden="true"></span>
<span class="sr-only">Previous</span>
</a>
<a class="carousel-control-next" href="#carouselExampleIndicators" role="button" data-slide="next">
<span class="carousel-control-next-icon" aria-hidden="true"></span>
<span class="sr-only">Next</span>
</a>
</div>
</div>
</div>
<!-- row 끝 -->
<!-- 상단 컨텐츠 끝 -->
<!-- 중앙 컨텐츠 시작 -->
<div class="row" style="margin-top:10px;">
<div class="col-lg-8">
<div class="row">
<div class="col-sm-6">
<h2>Heading</h2>
<p>Donec id elit non mi porta gravida at eget metus. Fusce
dapibus, tellus ac cursus commodo, tortor mauris condimentum
nibh, ut fermentum massa justo sit amet risus. Etiam porta sem
malesuada magna mollis euismod. Donec sed odio dui.
malesuada magna mollis euismod. Donec sed odio dui.
malesuada magna mollis euismod. Donec sed odio dui.
malesuada magna mollis euismod. Donec sed odio dui.
</p>
<p>
<a class="btn btn-success" href="#" role="button">View details »</a>
</p>
</div>
</div>
</div>
<div class="col-lg-4">
<ul class="list-group" style="padding-top: 15px;">
<li class="list-group-item d-flex justify-content-between align-items-center">
A first list item
<span class="badge badge-primary badge-pill">14</span>
</li>
<li class="list-group-item d-flex justify-content-between align-items-center">
A second list item
<span class="badge badge-primary badge-pill">10</span>
</li>
<li class="list-group-item d-flex justify-content-between align-items-center">
A third list item
<span class="badge badge-primary badge-pill">7</span>
</li>
<li class="list-group-item d-flex justify-content-between align-items-center">
A fourth list item
<span class="badge badge-primary badge-pill">5</span>
</li>
<li class="list-group-item d-flex justify-content-between align-items-center">
A fifth list item
<span class="badge badge-primary badge-pill">15</span>
</li>
<li class="list-group-item d-flex justify-content-between align-items-center">
A sixth list item
<span class="badge badge-primary badge-pill">1</span>
</li>
</ul>
</div>
</div>
<!-- row 끝 -->
<!-- 중앙 컨텐츠 끝 -->
<!-- 썸네일 시작(이미지에 보더가 생기는 것임) -->
<div class="row">
<div class="col-sm-6 col-lg-3">
<div>
<img src="http://mdh2057.m/images/Koala.jpg" alt="thumbnail" class="img-thumbnail" width="260">
<div>
<h3>Thumbnail label</h3>
<p>Cras justo odio, dapibus ac facilisis in, egestas eget
quam. Donec id elit non mi porta gravida at eget metus. Nullam id
dolor id nibh ultricies vehicula ut id elit.
</p>
</div>
</div>
</div>
</div>
<!-- row 끝 -->
<!-- 썸네일 끝 -->
<jsp:include page="footer.jsp" />===== 널빤지 JSP 전체 코드 =====
<%@ page language="java" contentType="text/html; charset=UTF-8"
pageEncoding="UTF-8"%>
<jsp:include page="header.jsp" />
<!-- 상단 컨텐츠 시작 -->
<div class="row custom-topcontents">
<div class="col-md-3">
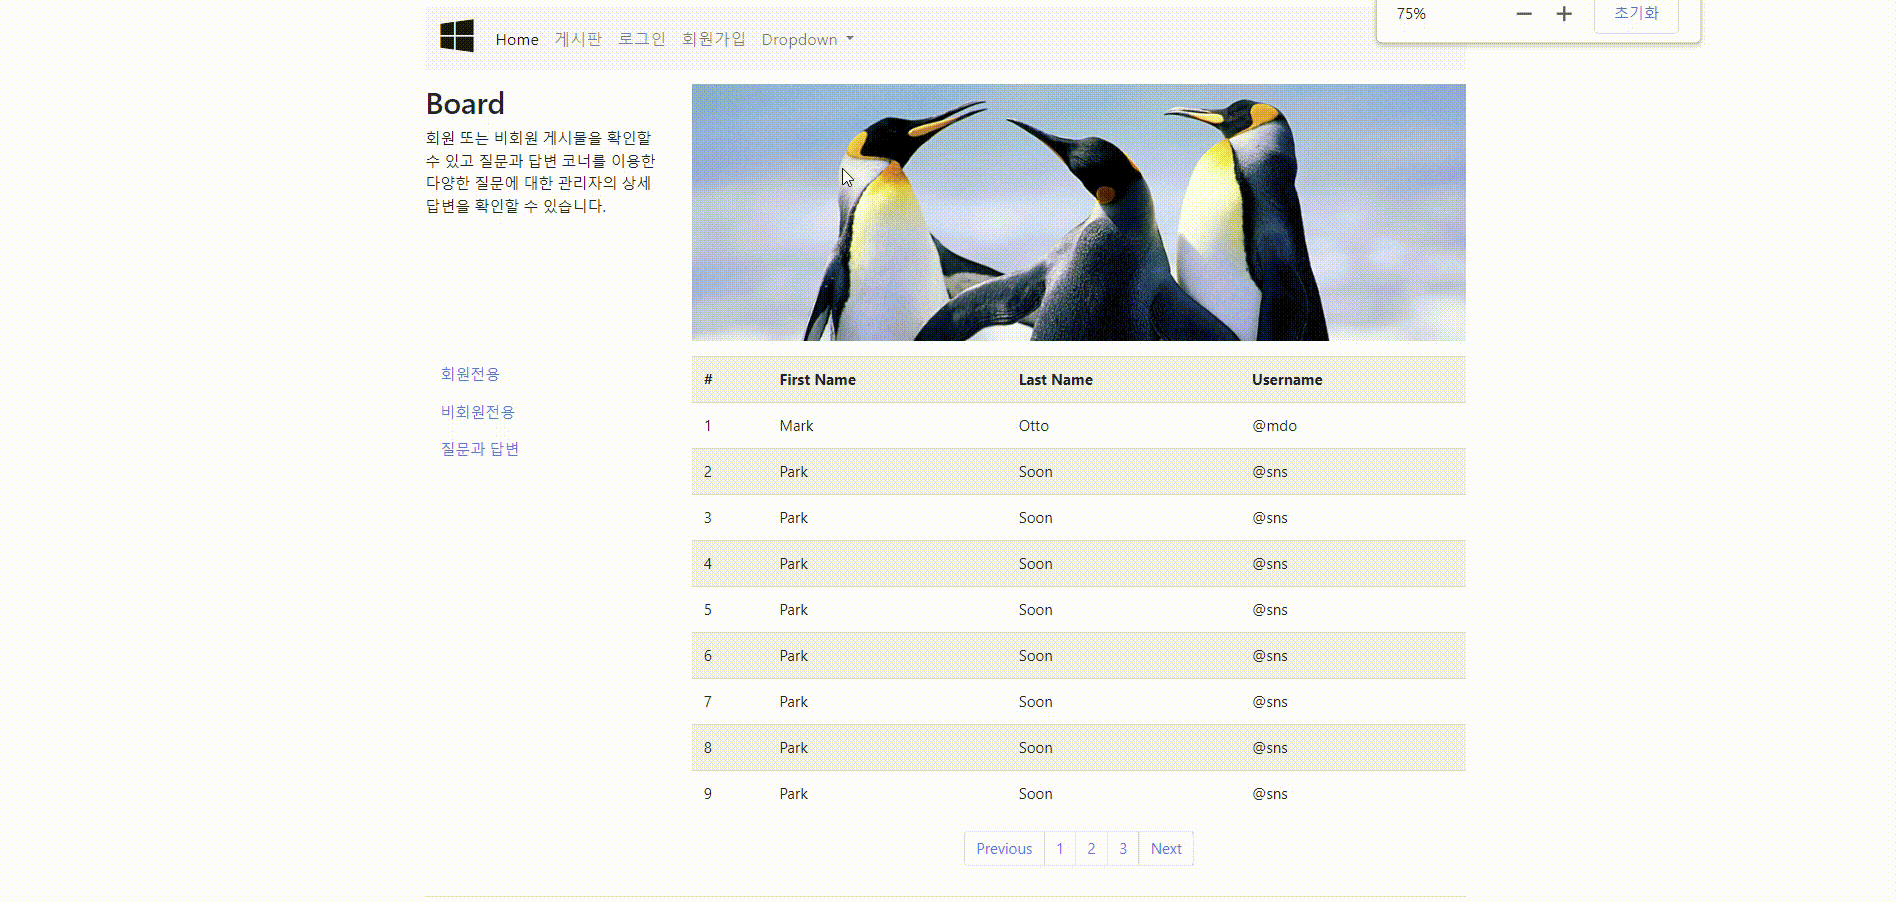
<h2>Board</h2>
<p>회원 또는 비회원 게시물을 확인할 수 있고 질문과 답변 코너를 이용한 다양한 질문에 대한 관리자의 상세
답변을 확인할 수 있습니다.
</p>
</div>
<div class="col-md-9">
<img src="http://mdh2057.m/./images/Penguins.jpg" class="img-fluid" alt="반응형 게시판 이미지">
</div>
</div>
<!-- row 끝 -->
<!-- 상단 컨텐츠 끝 -->
<!-- 중앙 컨텐츠 시작 -->
<div class="row custom-topcontents">
<div class="col-md-3">
<ul class="nav flex-column">
<li class="nav-item">
<a class="nav-link" href="#">회원전용</a>
</li>
<li class="nav-item">
<a class="nav-link" href="#">비회원전용</a>
</li>
<li class="nav-item">
<a class="nav-link" href="#">질문과 답변</a>
</li>
</ul>
</div>
<div class="col-md-9">
<div class="table-responsive">
<!-- .table-responsive 반응형 테이블(테이블의 원래 크기를 보존해주기 위한 것으로써, 디바이스의 width가 작아지면 테이블 하단에 스크롤이 생김) -->
<table class="table table-striped">
<tr>
<th>#</th>
<th>First Name</th>
<th>Last Name</th>
<th>Username</th>
</tr>
<tr>
<td>1</td>
<td>Mark</td>
<td>Otto</td>
<td>@mdo</td>
</tr>
<tr>
<td>2</td>
<td>Park</td>
<td>Soon</td>
<td>@sns</td>
</tr>
<tr>
<td>3</td>
<td>Park</td>
<td>Soon</td>
<td>@sns</td>
</tr>
<tr>
<td>4</td>
<td>Park</td>
<td>Soon</td>
<td>@sns</td>
</tr>
<tr>
<td>5</td>
<td>Park</td>
<td>Soon</td>
<td>@sns</td>
</tr>
<tr>
<td>6</td>
<td>Park</td>
<td>Soon</td>
<td>@sns</td>
</tr>
<tr>
<td>7</td>
<td>Park</td>
<td>Soon</td>
<td>@sns</td>
</tr>
<tr>
<td>8</td>
<td>Park</td>
<td>Soon</td>
<td>@sns</td>
</tr>
<tr>
<td>9</td>
<td>Park</td>
<td>Soon</td>
<td>@sns</td>
</tr>
</table>
</div>
<!-- 페이지네이션 -->
<nav>
<ul class="pagination justify-content-center">
<li class="page-item"><a class="page-link" href="#">Previous</a></li>
<li class="page-item"><a class="page-link" href="#">1</a></li>
<li class="page-item"><a class="page-link" href="#">2</a></li>
<li class="page-item"><a class="page-link" href="#">3</a></li>
<li class="page-item"><a class="page-link" href="#">Next</a></li>
</ul>
</nav>
</div>
</div>
<!-- row 끝 -->
<!-- 중앙 컨텐츠 끝 -->
<jsp:include page="footer.jsp" />===== 로그인 JSP 전체 코드 =====
<%@ page language="java" contentType="text/html; charset=UTF-8"
pageEncoding="UTF-8"%>
<jsp:include page="header.jsp" />
<!-- 상단 컨텐츠 시작 -->
<div class="row custom-topcontents">
<div class="col-md-3">
<h2>로그인</h2>
<p>회원 로그인 화면입니다. 회원 아이디와 비밀번호를 입력하고 로그인하세요.</p>
</div>
<div class="col-md-9">
<img src="http://mdh2057.m/./images/Koala.jpg" class="img-fluid" alt="반응형 로그인 이미지">
</div>
</div>
<!-- row 끝 -->
<!-- 상단 컨텐츠 끝 -->
<!-- 중앙 컨텐츠 시작 -->
<div class="row custom-topcontents">
<div class="col-md-3">
<ul class="nav flex-column">
<li class="nav-item">
<a class="nav-link" href="register.html">회원가입</a>
</li>
<li class="nav-item">
<a class="nav-link" href="#">아이디찾기</a>
</li>
<li class="nav-item">
<a class="nav-link" href="#">비밀번호찾기</a>
</li>
</ul>
</div>
<div class="col-md-9">
<!-- 경고 메시지 시작 -->
<div class="alert alert-warning alert-dismissible fade show" role="alert">
공용으로 사용하는 PC에서는 "비밀번호 기억하기"를 체크하면 개인정보 유출의 위험이있습니다.
<button type="button" class="close" data-dismiss="alert" aria-label="Close">
<span aria-hidden="true">×</span>
</button>
</div>
<!-- 경고 메시지 끝 -->
<!-- 로그인 폼 시작 -->
<form action="login.do" method="post">
<fieldset>
<legend>회원 로그인</legend>
<div class="row">
<div class="col-md-9">
<div class="form-group row">
<div class="col-md-3">
<label for="email">아이디</label>
</div>
<div class="col-md-9">
<input class="form-control" type="email" id="email" name="email" placeholder="아이디" autocomplete="off" required />
</div>
</div>
<div class="form-group row">
<div class="col-md-3">
<label for="pwd">비밀번호</label>
</div>
<div class="col-md-9">
<input class="form-control" type="password" id="pwd" name="pwd" placeholder="비밀번호" required />
</div>
</div>
<div class="form-group">
<label for="user_remember_me">비밀번호 기억하기</label>
<input type="checkbox" id="user_remember_me" name="remember" value="1" />
</div>
</div>
<div class="col-md-3">
<input class="btn btn-success" type="submit" value="로그인" style="height: 85px;" />
</div>
</div>
</fieldset>
</form>
<!-- 로그인 폼 끝 -->
</div>
</div>
<!-- row 끝 -->
<!-- 중앙 컨텐츠 끝 -->
<jsp:include page="footer.jsp" />===== 등록하다 JSP 전체 코드 =====
<%@ page language="java" contentType="text/html; charset=UTF-8"
    pageEncoding="UTF-8"%>

 <jsp:include page="header.jsp" />

	<!-- 상단 컨텐츠 시작 -->
	<div class="row custom-topcontents">
		<div class="col-md-3">
			<h2>회원가입</h2>
				<p>회원 가입 화면입니다. 회원 가입하시면 회원만의 특화된 서비스를 이용하실 수 있습니다.</p>
			</div>
		<div class="col-md-9">
			<img src="http://mdh2057.m/./images/Lighthouse.jpg" class="img-fluid" alt="반응형 회원가입 이미지">
		</div>
	</div>
	<!-- row 끝 -->
	<!-- 상단 컨텐츠 끝 -->

	<!-- 중앙 컨텐츠 시작 -->
	<div class="row custom-topcontents">
		<div class="col-md-3">
			<ul class="nav flex-column">
			  <li class="nav-item">
			    <a class="nav-link" href="login.html">로그인</a>
			  </li>
			  <li class="nav-item">
			    <a class="nav-link" href="#">아이디찾기</a>
			  </li>
			  <li class="nav-item">
			    <a class="nav-link" href="#">비밀번호찾기</a>
			  </li>
			</ul>
		</div>
		<div class="col-md-9">
			<form action="register.do" method="post">
				<fieldset>
					<legend>회원 가입</legend>
						<div class="form-group">
							<div class="row">
								<div class="col-md-3">
									<label for="email">아이디</label>
								</div>
								<div class="col-md-9">
									<input class="form-control" type="email" id="email"	name="email" placeholder="이메일을 입력하세요" autocomplete="off" required />
								</div>
							</div>
						</div>
						<div class="form-group">
							<div class="row">
								<div class="col-md-3">
									<label for="pwd">비밀번호</label>
								</div>
								<div class="col-md-9">
									<input class="form-control" type="password" id="pwd" name="pwd"	placeholder="6~12자 사이로 입력" required />
								</div>
							</div>
						</div>
						<div class="form-group">
							<div class="row">
								<div class="col-md-3">
									<label for="name">이름</label>
								</div>
								<div class="col-md-9">
									<input class="form-control" type="text" id="name" name="name" autocomplete="off" required />
								</div>
							</div>
						</div>
						<div class="form-group">
						    <div class="row">
								<div class="col-md-3">
									<label for="tel">휴대폰</label>
								</div>
								<div class="col-md-9">
									<input class="form-control" type="tel" id="tel" name="tel" />
								</div>
							</div>
						</div>
						<div class="form-group custom-submit">
							<input class="btn btn-success" type="submit" value="전송">
						</div>

					</fieldset>
				</form>
			</div>
		</div>

<jsp:include page="footer.jsp" />
===== 헤더 JSP 전체 코드 =====
<%@ page language="java" contentType="text/html; charset=UTF-8"
    pageEncoding="UTF-8"%>


<%
	String ctxPath = request.getContextPath();
	//    /JSPSevletBegin
%>


<!doctype html>
<html lang="ko">
  <head>
    <!-- Required meta tags -->
    <meta charset="utf-8">
    <meta name="viewport" content="width=device-width, initial-scale=1, shrink-to-fit=no">
	<title>부트스트랩 페이지 링크 예제</title>

	<!-- Bootstrap CSS -->
    <link rel="stylesheet" href="http://mdh2057.m/<%= ctxPath %>/bootstrap-4.6.0-dist/css/bootstrap.min.css" type="text/css">

    <!-- Font Awesome 5 Icons -->
    <link rel="stylesheet" href="https://cdnjs.cloudflare.com/ajax/libs/font-awesome/5.15.4/css/all.min.css">

    <!-- 직접 만든 CSS -->
    <link rel="stylesheet" href="./css/mycss.css">

  </head>
  <body>
  <div class="container">

	<!-- 상단 네비게이션 시작 -->
	<nav class="navbar navbar-expand-lg navbar-light bg-light">
		  <!-- 표준 탐색 모음은 .navbar 클래스를 사용하여 생성되고 반응형 축소 클래스(.navbar-expand-xl|lg|md|sm)가 뒤따릅니다. -->
	      <!-- Large(lg) ==> 992px 이상  1200px미만. navbar-expand-lg 은 width 가 991px 되어지는 순간 nav 이 축소되어진다. -->

		  <!-- Brand/logo --> <!-- Font Awesome 5 Icons -->
		  <a class="navbar-brand" href="#"><i class="fab fa-windows fa-2x"></i></a> <!-- 아이콘은 윈도우로 함. -->

		  <!-- 아코디언 같은 Navigation Bar 만들기 -->
		  <button class="navbar-toggler" type="button" data-toggle="collapse" data-target="#collapsibleNavbar">
		    <span class="navbar-toggler-icon"></span>
		  </button>

		  <div class="collapse navbar-collapse" id="collapsibleNavbar">
		    <ul class="navbar-nav">
		       <li class="nav-item active">
		         <a class="nav-link menufont_size" href="index.jsp">Home</a>
		       </li>
		       <li class="nav-item"><a class="nav-link menufont_size" href="board.jsp">게시판</a></li>
			   <li class="nav-item"><a class="nav-link menufont_size" href="login.jsp">로그인</a></li>
			   <li class="nav-item"><a class="nav-link menufont_size" href="register.jsp">회원가입</a></li>
		       <li class="nav-item dropdown">
		         <a class="nav-link dropdown-toggle menufont_size" href="#" id="navbarDropdown" data-toggle="dropdown">
		           Dropdown
		         </a>
		         <div class="dropdown-menu" aria-labelledby="navbarDropdown">
		           <a class="dropdown-item" href="#">Action</a>
		           <a class="dropdown-item" href="#">Another action</a>
		           <div class="dropdown-divider"></div>
		           <a class="dropdown-item" href="#">Something else here</a>
		         </div>
		       </li>
		    </ul>
		  </div>
	</nav>
	<!-- 상단 네비게이션 끝 -->
===== 보행인 JSP 전체 코드 =====
<%@ page language="java" contentType="text/html; charset=UTF-8"
pageEncoding="UTF-8"%>
<%
String ctxPath = request.getContextPath();
// /JSPSevletBegin
%>
<hr>
<!-- 푸터 시작 -->
<div id="footer">
<p class="text-center">© Company 2022</p>
</div>
</div>
<!-- .container 끝 -->
<!-- Optional JavaScript -->
<script src="http://mdh2057.m/<%= ctxPath%>/js/jquery-3.6.4.min.js" type="text/javascript"></script>
<script src="<%= ctxPath%>/bootstrap-4.6.0-dist/js/bootstrap.min.js" type="text/javascript"></script>
</body>
</html>===== 결과 =====